Here you can find answers to frequently asked questions. Feel free to contact us if you can’t find answer to your question.
- Do you have list of hooks and filters? – Yes, hook list is below:
woocommerce_simple_auctions_before_place_bid
woocommerce_simple_auctions_outbid
woocommerce_simple_auctions_proxy_outbid
woocommerce_simple_auctions_place_bid
woocommerce_simple_auctions_log_bid
woocommerce_simple_auctions_place_sealedbid
woocommerce_simple_auction_started
woocommerce_simple_auction_finished
woocommerce_simple_auction_close
woocommerce_simple_auction_fail
woocommerce_simple_auction_reserve_fail
woocommerce_simple_auction_won
pre_get_auction_search_form
woocommerce_before_bid_form
woocommerce_before_bid_button
woocommerce_after_bid_button
woocommerce_after_bid_form
woocommerce_product_options_auction
woocommerce_simple_auction_do_relist
woocomerce_before_relist_failed_auction
woocomerce_after_relist_failed_auction
woocomerce_before_relist_not_paid_auction
woocomerce_after_relist_not_paid_auction
woocommerce_simple_auction_pay_reminder
woocommerce_simple_auction_close_buynow
woocommerce_simple_auction_delete_bid
woocommerce_simple_auction_admin_history_header
woocommerce_simple_auction_admin_history_row
woocommerce_simple_auction_end_auctions_meta_callback
woocommerce_simple_auction_after_delete_fom_watchlist
woocommerce_simple_auction_after_add_to_watchlist
woocommerce_simple_auction_closing_soon
woocommerce_simple_auctions_changed_max_bid
woocommerce_simple_auctions_changed_min_bid
Example:
<?php add_action( 'woocommerce_simple_auctions_before_place_bid, 'custom_function' ); ?>
Here is list of all filters:
woocommerce_simple_auctions_before_place_bid
woocommerce_simple_auctions_proxy_curent_bid_value
woocommerce_simple_auctions_proxy_bid_value
simple_auction_item_condition
simple_auction_type
woocommerce_simple_auctions_get_current_bid
woocommerce_simple_auctions_get_increase_bid_value
woocommerce_simple_auctions_get_condition
woocommerce_simple_auctions_get_auction_end_time
woocommerce_simple_auctions_get_auction_start_time
woocommerce_simple_auctions_get_seconds_remaining
woocommerce_simple_auctions_get_seconds_to_auction
woocommerce_simple_auctions_bid_value
woocommerce_simple_auctions_is_user_biding
woocommerce_simple_auctions_get_user_max_bid
woocommerce_simple_auctions_is_sealed
wsa_default_auction_orderby
wsa_default_auction_orderby_options
woocommerce_simple_auction_auction_bage
woocommerce_simple_auction_pay_now_button
woocommerce_auction_history_heading
woocommerce__auction_history_data
auction_history_started_text
auction_history_starting_text
woocommerce_simple_auctions_placed_bid_message
woocommerce_simple_auctions_winning_bid_message
woocommerce_simple_auction_empty_cart
simple_auctions_relist_date_from
simple_auctions_relist_date_to
woocommerce_place_bid_product_id
woocommerce_place_bid_bid
woocommerce_place_bid_handler
remove_auctions_from_woocommerce_product_query
woocommerce_simple_auctions_displayname
simple_auction_ajax_finish_auction
simple_auction_get_price_for_auctions
reserve_bid_text
reserve_met_bid_text
sealed_bid_text
sealed_min_text
woocommerce_simple_auctions_activity_query
woocommerce_simple_auctions_place_bid_value
woocommerce_simple_auctions_before_place_bid_filter
woocommerce_simple_auctions_minimal_bid_value
woocommerce_simple_auctions_proxy_bid_to_reserve
woocommerce_simple_auctions_proxy_curent_bid_value
woocommerce_simple_auctions_proxy_bid_value
woocommerce_simple_auctions_is_user_watching
woocommerce_shortcode_auctions_query
woocommerce_product_query_max_rand_cache_count
woocommerce_simple_auctions_activity_column_default
woocommerce_simple_auctions_activity_row_class
woocommerce_simple_auctions_activity_columns
woocommerce_simple_auctions_activity_sortable_columns
get_auction_search_form
time_text
bid_text
woocommerce_simple_auction_winning_bage
- How to use simple_auction_item_condition filter? – In functions.php add:
add_filter('simple_auction_item_condition', 'my_example_filter_1' );
function my_example_filter_1( $array ){
$array['old']='Old';
return $array;
}
and in product data you will get new product condition option available to select named “Old”.
- How to increase bid step for bid increment value to be more than 1? Bidding increment is done so you can bid in increments of 1, because otherwise if you set bid step of say 5, you would be able to bid 5, 10, 15…
instead you can bid 7, 13, 22, etc. If you insist on different behaviour, you need to edit template woocommerce-simple-auctions\templates\single-product\auction-bid-form.php line 50 and change:
step="any"
becomes
step="<?php echo ($product->get_increase_bid_value()) ? $product->get_increase_bid_value() : '1' ?>"
Please check template on pastebin.
Bid increment of 1 in bid form allows users to place any bid that satifies minimum bid increment amount condition + custom additional amount user wants to add to minimum increment.
- Can I delete fake bid? – Yes, go to item details, section Auction where auction log is and click on delete.
- Can users create their own auctions like on eBay? Can I charge fee for auctions published by users? – Yes but you need 3rd party plugin for implementing WooCommerce multivendor / marketplace. Then your users will be able to post auctions and you can charge fee for their sales. You can use Dokan multivendor plugin which has frontend auction submissions (you need Business version or Free, Starter, Professional with Auction module). There is also free plugin which allows you to charge a fee on checkout.
- Do you use cronjobs? – Yes. Please check installation instructions. Cronjobs are used to finish auctions consistently for all users and at right time, send email notifications and automatically relist expired / failed auctions (optional). Auction check cron has to be run every minute, script will be loading for almost 1 minute, then it stops with HTTP 200 response code – there should be no output just blank page. Read here why we use and suggest real cronjobs for our plugins (and WordPress).
- Where can I edit email templates? – Go to WooCommerce > Settings and click on Emails tab.
- Does this plugin work with caching plugins? – Yes, WP Super Cache, WP Rocket, WP Fastest Cache, W3TC and other caching plugins work fine in combo with our auction plugin but we advise no caching for logged in users. For example if page cache is enabled widget recently viewed auctions will not work properly. Once user is logged in and there is no caching anymore all widgets work. You can use CDN and browser caching. Our plugin demo website uses WP Super Cache with page and browser cache. Object caching should be disabled (if possible). All of our plugins have same requirements for caching as WooCommerce – check it here https://docs.woocommerce.com/document/configuring-caching-plugins/
- What is auto bidding / proxy bidding? – Ebay has nice explanation here. Basically you enter your max bid value but plugin raises current bid to current bid + min bid increase instead to your max value entered. Regular bidder will be outbidded automatically until your max bid value is reached.
- What is reserve price? – A reserve price is the lowest price at which you are willing to sell your item. If you do not want to sell your item below a certain price, you can a set a reserve price. The amount of your reserve price is not disclosed to your bidders, but they will see that your auction has a reserve price and whether or not the reserve has been met. If a bidder does not meet that price, you are not obligated to sell your item.
- I want auction end timer on product archive, shortcodes and widgets, what should I do? – You can add this code snippet to functions.php https://pastebin.com/BWiswYec
- I want to increase / extend auction end time after bid was placed? – Add this code to functions.php (this particular code extends auction for 30 sec – note PT30S) https://pastebin.com/gv8WaNDq
- I want to extended auction finish time after a bid is placed so that it only extends the auction if a bid is placed when the auction is within 5 min of closing? Auction anti snipping feature. – From version v2.1.0 this feature is integrated in plugin and no need to use code snippet for this.
- Bidder beat another bidder with same amount? – When Proxy Bidding is in effect, it can appear as if one bidder has beat another bidder with the same bid amount. This is normal and occurs when a bidder has a proxy bid in effect and a second bidder comes along and makes their bid at the exact same amount the current proxy bid is at. Since the proxy bid was placed earlier, that is the bid that will succeed. For the second bidder to succeed in placing a bid, they must bid higher than the proxy bid that is in effect.
- How can I show only finished auctions? – You need custom page template with custom query:
$args = array(
'post_type' => 'product',
'tax_query' => array(array('taxonomy' => 'product_type' , 'field' => 'slug', 'terms' => 'auction')),
'meta_query' => array(
array(
'key' => '_auction_closed',
'operator' => 'EXISTS',
)
),
'auction_arhive' => TRUE,
'show_past_auctions' => TRUE
);
$the_query = new WP_Query( $args );
You can download custom page template with custom query for auctions which shows only finished auctions. There is also shortcode to show past / finished auctions.
Here is another example: custom page template that shows finished but not paid auctions.
- Can I make theme with WooCommerce Simple Auctions and sell it on ThemeForest? – Sure, just purchase extended licence and you’re good to go.
Since the current licenses do not deal with re-selling Items, Envato lets authors to decide whether they grant permission for bundling Items or not. We have the following conditions, and you need to follow them:
- You cannot redistribute the item “as-is”, even if you modify it or you make a derivative version for another platform
- You cannot offer the plugin as a stand-alone item
- You cannot include the plugin separately from your theme in the download package
- You cannot provide an Item Purchase Code for your customers – Since Envato doesn’t have a “multi-use” or transferable license, your customers are not entitled to receive an Item Purchase Code with your theme and use the plugin separately from your work.
- Updating the plugin is your own responsibility
- Since your customers cannot receive updates from us, you need to handle this on your own
- You need to handle related support requests after your customers or you can instruct them to buy regular licence and ask us for support directly via our CodeCanyon profile (we cannot provide free support for your customers)
- I can’t do anything because I get “out of stock message”? – Simple Auctions plugin needs inventory / stock to be enabled. If you have problems all issues should be fixed by upgrading to WooCommerce Simple Auctions v1.1.6
- I want to enable users to bid even if they are allready highest bidder? – In update v1.1.25 we have added setting option “Allow highest bidder to outbid himself”, please use that setting to allow outbidding.
- I have installed WC Vendors and I do not see auction product type? –
WC Vendors support WooCommerce Simple Auctions plugin. If you have issues we recommend that you contact WC Vendors support. Other multivendor plugins that support Simple Auctions can be found here.
- How can I update plugin with new version? Is auto updating possible? – We suggest you to install Envato Marketplace (installation instructions can be found on plugin’s url) plugin for auto update plugin and themes purchased on Envato. Setup is easy. Manual updating can be done by downloading new version of plugin and overwrite old files with new ones or deleting old plugin and installing new one.
Note:
If you have modified plugin files (templates) then you need to be careful when updating so you don’t overwrite changes you made and that templates are inside child theme or theme woocommerce/ template folder.
- How to change max bid for proxy bidding? – There is setting in WooCommerce Settings > Auction that needs to be enabled which allows users to change their max bid value.
- Is it possible when a customer wins 2 or more auctions they all appear in the cart at the same time and than check-out all items at once? I want more than one auction in cart! – In file woocommerce-simple-auctions\woocommerce-simple-auctions.php find and comment line 1510:
You might want to change this line:
wp_safe_redirect( remove_query_arg( array( 'pay-auction', 'quantity', 'product_id' ), wc_get_checkout_url()) ) );
to
wp_safe_redirect( remove_query_arg( array( 'pay-auction', 'quantity', 'product_id' ), wc_get_cart_url() ) );
so auction Pay Now button leads to cart instead going directly to checkout.
- How to increase bid input field? – Easiest way is by using custom CSS:
You can use this CSS to add it to your theme’s custom CSS:
input[name=bid_value] {
width: 195px !important;
}
Note:
You may noticed double plus and minus near bid input field on screenshot above. This is known issue with some themes. For solution see FAQ item no 25.
- The Sort by price does not work. Is it posible to sort the auctions based on what has the highest or lowest bid? –
Yes, we have added auction specific sorting. Frontend auction sorting is availabe, you can sort auctions by current bid, date, buy now price, activity, ending date (ending soonest) and start date (recently started). Feature is available from version 1.2 of Simple Auction plugin.
- I see two plus and minus buttons near bid input field? – This is known issue with some themes, due to their JS, solution is simple you need to comment out last line (173) in file
woocommerce-simple-auctions\js\simple-auction-frontend.js (example of that problem can be seen on screenshot in FAQ no 23):
Fix for Enfold theme is modified bid.php template file which you need to copy to your_child_theme/wooocommerce/single-product/bid.php to remove double plus / minus buttons.
We also have fix for Woodmart Theme, just add this code snippet to your child theme functions.php file.
- I want to remove automatic relist option for users (for example when using multi vendor / sellers plugin)? You can use this code to do that (add code to your theme’s
functions.php file):
function remove_post_custom_fields() {
remove_meta_box( 'Automatic_relist_auction' , 'product' , 'normal' );
}
add_action( 'add_meta_boxes', 'remove_post_custom_fields', 20);
- Is there a way to enable confirmation before placing a bid? Yes, you can use this code (http://pastebin.com/pKZurFsB):
function print_my_inline_script() {
if ( is_product()) {
?>
<script type="text/javascript">
jQuery('.auction_form.cart').submit(function() {
var c = confirm("Click OK to continue?");
return c;
});
</script>
<?php
}
}
add_action( 'wp_footer', 'print_my_inline_script' );
- Does WooCommerce Simple Auctions work with WordPress import / export tools? – Yes, you can export and import auctions with standard WordPress import / export tools that are located in Admin -> Tools menu.
- I want to add bid button everywhere not only on single auction page? – You can add following code to your functions.php but you will need to style it properly using CSS – https://pastebin.com/fV33s8Gr
- How can I enable user registration on login page? – You need to enable that feature in WooCommerce settings.
- I have installed your plugin but images are not aligned, buttons are too small / big, input fields needs to be smaller / bigger, can you help? – In short no.
It’s your duty to modify plugin template to match your style and theme. Themes can implement different ways how they customize pages and parts of WooCommerce. We cannot guarantee that our plugin will look same as in our demo for every possible theme out there. Web developing is more than
getting a theme and couple plugins, enabling them and deliver web site. Our templates are coded by standards and they adhere to WordPress and WooCommerce template structure.
That means that minimal intervention is needed from client side, but sometimes there is no way to avoid template changes. Some themes use similar structure and have minimal interventions in structure and our plugin looks good out of the box and some do not.
It’s your task as web developer and client who purchased plugin to modify and customize plugin templates to match your own (or client’s) needs and styles. This is part of developing a web site.
You cannot expect that everything will be perfect for every possible theme and plugin comibation out there or that we will do your job for you as part of support. We support plugin – we do not style and customize client’s sites.
Thanks for understanding.
Note:
Right way to customize plugin’s templates is to copy contest of plugin_dir/woocommerce-simple-auctions/templates/ directory to your_theme/woocommerce/ directory and do modifications there.
When you ask us for support make sure it’s not related to tasks we don’t do as part of support:
– style or customize your theme to do this or that
– provide support for bugs caused by 3rd party plugins or themes (we can pinpoint that some plugin is problematic)
– send you CSS or HTML code for modifying html elements
- What are custom meta fields for auction product type (useful for CSV Product Import)?
_auction_item_condition
_auction_type
_auction_proxy
_auction_start_price
_auction_bid_increment
_auction_reserved_price
_auction_dates_from
_auction_dates_to
_auction_current_bid
_auction_current_bider
_auction_max_bid
_auction_max_current_bider
_auction_bid_count
_auction_closed
_auction_has_started
_auction_fail_reason
_order_id
_stop_mails
_auction_wpml_language
_auction_automatic_relist
_auction_relist_fail_time
_auction_relist_not_paid_time
_auction_relist_duration
_regular_price (for buy now price!)
Sample CSV file can be downloaded here. You can use Tools -> Import -> WooCommerce products (CSV) importer which imports products to your store via a CSV file.
_auction_closed values explained:
1 - Auction failed (because there were no bids or auction failed because item did not make it to reserve price)
2 - Normal Auction end - closed with highest bidder winning the auction
3 - Product sold for buy now price
- Is it possible to set proxy auctions on by default for all auctions? – There is option in Auction settings to enable this by default for all auctions. Please check plugin options part of this documentation.
- How to remove Simple Auction history tab or any WooCommerce tab in single product (auction) page? – Add code below to your_theme/functions.php (on the bottom):
add_filter( 'woocommerce_product_tabs', 'woo_remove_product_tabs', 98 );
function woo_remove_product_tabs( $tabs ) {
unset( $tabs['simle_auction_history'] );
return $tabs;
}
To remove other WooCommerce tab(s) code is:
add_filter( 'woocommerce_product_tabs', 'woo_remove_product_tabs', 98 );
function woo_remove_product_tabs( $tabs ) {
unset( $tabs['tab_name'] );
return $tabs;
}
- I can’t see auctions on shop page? I have defined auction base page and I still don’t see anything?
If you want auctions on shop page in auctions settings make sure that you have not
checked settings “do not mix auctions and regular products”.
Stock management has to be enabled otherwise you won’t see auctions.
If you use WPML you need to define auction base page and make its translation in order to see auctions.
Some rouge plugin that modifies WP query in some weird way. Try disabling all plugins and leave only WooCommerce and Simple auction.
Poorly coded theme that modifies WP query. Change theme to default one which comes with WordPress to test if that’s the problem.
- I want to limit only bid increment not whole bid value? You can limit absolute bid value in Simple Auctions settings. To limit single max bid input you can use this code https://pastebin.com/6SLf3rM5 in your functions.php file.
- How can I get refund if I’m not satisfied?
If you have problem with our items we require that you first get in touch with us so we can try to solve your problem. Our items are extensively tested and we will do everything to help you with problems you might encounter.
More about how to get refund on Envato can be found here and here.
- How can I translate plugin to my language? Do you have translations?
We only maintain english translation. We do not have resources to quality maintain other translations. If you have trasnlation, you can submit one to us and we will post it here for download if someone wants it, but those will be unofficial.
Here are steps which can help you to traslate plugin yourself:
Note:
In filename wc_simple_auctions-en_GB.po suffix en_GB must match your language settings in WordPress, otherwise language will not be loaded. So for example you can have wc_simple_auctions-en_AU.mo,
wc_simple_auctions-af.mo or wc_simple_auctions-en_CA.mo, complete list of available suffixes are here https://make.wordpress.org/polyglots/teams/
- Where can I find max proxy bid for auction?
In wp-admin -> product details here is screenshot.
- Does the user have to be logged in to be able to bid? Why?
User has to be logged in because we don’t have reliable way to track its bid(s) otherwise. If you have real auction site at one moment user(s) will have to enter details for shipping, payment etc,
it’s also a way to filter serious bidders and block fake accounts.
- 3rd party plugin is causing problems? Its developers tell you that we need to fix our plugin?
WooCommerce extensions should be transparent – meaning one extension should work with another without introduction of special code that makes them compatible. Imagine what would happen and how much time we
would need to spend if we would have to add a bit of compatibility code for every WooCommerce extension that’s out there – we would end up in huge plugin with tons of problems which would be problem
to test and debug. That’s why we think every plugin developer should stick to WooCommerce coding standards and APIs (they’re there for that reason) and not require 3rd party developers to code something
into their extensions / plugins so that it could work with theirs.
- How can I include winner user info in admin auction finished email notification?
You would need to copy template \woocommerce-simple-auctions\templates\emails\auction_finish.php to your_theme\woocommerce\emails\auction_finish.php and then add something like this:
$wining_user_id = get_post_meta( $product_id, '_auction_current_bider', true );
$user = get_userdata ( $wining_user_id );
you will then have all user info available in that template – https://codex.wordpress.org/Function_Reference/get_userdata
Please note that auction finished email notification is sent if auction has winner and is success otherwise auction failed notification is sent.
- Does it work with currency switching plugins? – We decided to skip currency switching support because each currency switching plugin uses its own hooks which we would have
to implement into plugin and maintain through updates. We did some testing and found out that free version of Currency Switcher displays different currecies fine, while paid does not for
some reason, Aelia Currency switcher does not work at all and fails with fatal error. It would require significant changes and modifications for us to bid in different currencies (possibly
introducing new bugs and problems) so we decided to skip multi currency support for auctions completely because it complicates a lot whole process of bidding and can confuse bidders
(for example someone bids $100 another bids 105.55 eur etc). If you need different currency auctions we think it is better to setup whole new auction site for different market / country with its own currency.
- Winning badge is hidden behind auction / product thumbnail. What can I do?
You need to change z-index for winning badge:
span.winning {z-index: 1000}
- Do you offer customization for buyers fee on auctions? – Yes, you can use this code snippet for that https://pastebin.com/rZeRGPU2.
- Auction ended but user (bidder) still can see countdown timer? Noticed that time left was out of sync on some computers? – Auctions use server time which is then translated to local time via JavaScript and considering computer’s local time.
So auction will be finished on exact time set, however if client (bidder) has wrong clock set (which is rare nowadays since all computers are automatically synced to Internet time) they can see that auction has ended (but it didn’t in fact) or
that auction has still going on but in fact has ended). They will try to bid but they will get error message. You need to instruct them to sort their clock issue and set aucto sync to Internet time.
If we would check server time each second that would be huge performance problem for busy sites and auctions which have a lot of participants and pages would not be cacheable.
- How can I show buy now price on category / archive pages? – You can use this code https://pastebin.com/yqvGCrjB in your functions.php
- How can I hide usernames in auction history list? – You need to edit template. First copy template woocommerce-simple-auctions\templates\single-product\tabs\auction-history.php to
your_theme\woocommerce\single-product\tabs\auction-history.php and edit file in that directory so update doesn’t override your changes.
Then find and remove lines (or comment them out) 46 and 62-66.
If you use ajax bid refresh you will need to do one more thing – in \plugins\woocommerce-simple-auctions\classes\class-wc-product-auction.php find and replace get_userdata($history_value->userid)->display_name with preg_replace(“/(?!^).(?!$)/”, “*”, get_userdata($history_value->userid)->display_name) otherwise when ajax update line you will get full username.
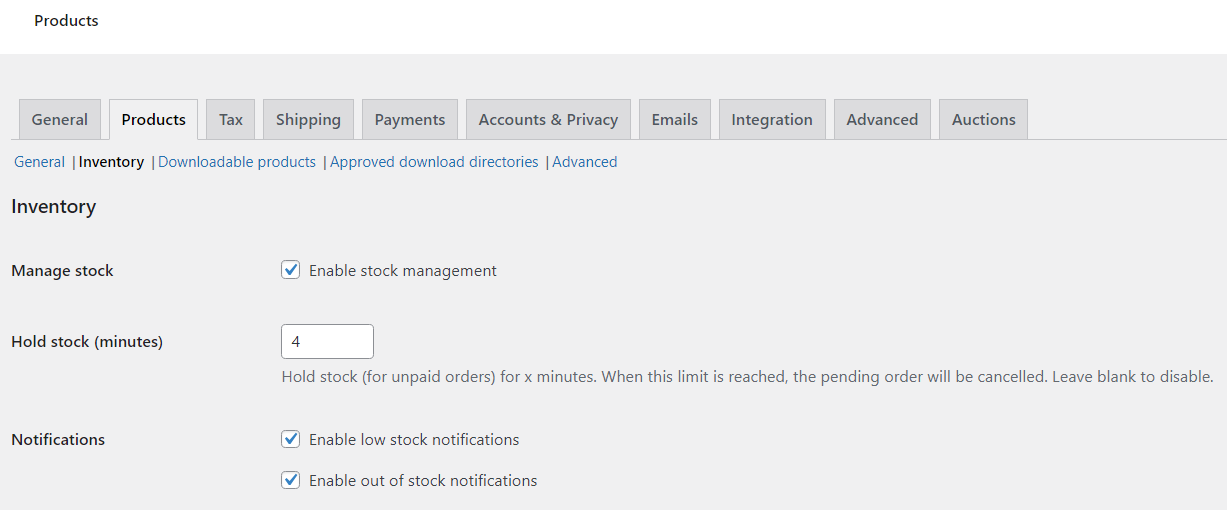
- I see products out of stock in related products? Why? I want to hide out of stock products from related products! – This is WooCommerce related and not WSA. You have to change WooCommerce setting called “Out of stock visibility” which is located in WooCommerce Settings -> Products -> Inventory tab.
- How can I place “add to watchlist” link to product archive page for all auctions? – You can add this code (thx Mike) to your functions.php:
add_action( 'woocommerce_shop_loop_item_title', 'add_to_watchlist', 50 );
function add_to_watchlist() {
global $product;
if (isset($product) && $product == true) {
wc_get_template('single-product/watchlist-link.php');
}
}
- I want auction details on product archive page? – You can use this snippet to add for example starting bid, current bid and max bid
https://pastebin.com/Jt4DRcXp
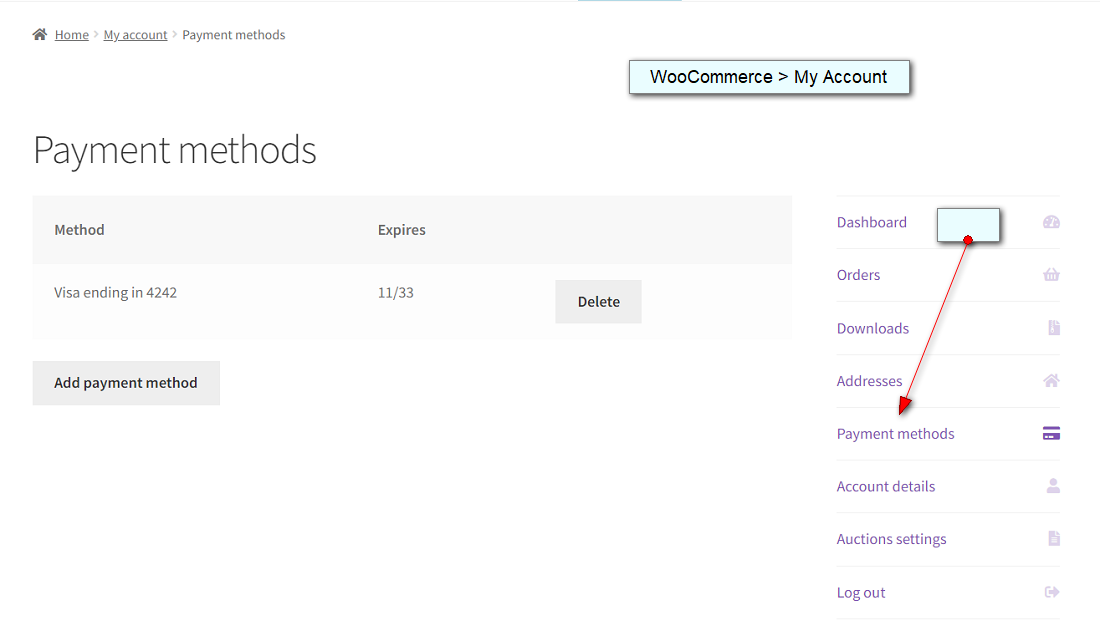
- I do not use reminder email notification, how can I remove Auction Settings from My Account? – You can do that via custom CSS:
.woocommerce-MyAccount-navigation-link--auctions-endpoint {display:none}
or by adding this snippet to functions.php:
add_filter ( 'woocommerce_account_menu_items', 'wpgenieorg_remove_my_account_links', 90);
function wpgenieorg_remove_my_account_links( $menu_links ){
unset( $menu_links['auctions-endpoint'] );
return $menu_links;
}
- I see two drop down sort boxes? How can I remove one? – You need to find appropriate action and remove it with code something like this:
remove_action('woocommerce_before_shop_loop', 'woocommerce_catalog_ordering', 30, 0);
Note that this action could have custom name because it was usually added by theme devs.
- Why orders are not automatically created when user wins auction? – Order is created when winner clicks pay now button. If user does not click on pay now button order will not be created. Once order is created users will see it under My account -> Orders. Before order is created user will see auction on pages where you display my auctions shortcode with pay now button. All winners will also receive email notification pay for auction reminder (how often depends on cronjob setting for cron named mails). In that reminder to pay notification winner will receive pay now link. Along that administrator will receive email notification when auction is finished or failed with info who won auction or why auction failed.
- What happens if winner does not want to pay for auction? – You can delete that winning bid and next highest bidder will be winner and will see pay now button for auction. There is auto relist option that can relist auction: “Relist if not paid after n hours”.
What happens when you manually delete winner (winning bid) and want next highest bidder to become winner? Is email automatically sent? When current highest bidder does not pay and you delete winning bid, mails are not sent automatically to the next highest bidder / winner. You would have to manually contact next higest bidder / winner and send auction url where they can see pay now button and make payment.
-
Product type column vanished in Woo product list, how can I get it back? – From WooCommerce 3.4.0 update, Woo developers removed that column in product list (as a result of users’ feedback). There is way to restore it back using this plugin https://wordpress.org/plugins/woocommerce-product-type-column/
-
When I click on bid button page loads slowly. Is there anything that can be done to speed up bid button request? – Sluggish website response (high TTFB times) on bid requests are 99% caused by slow mail server. When you click on bid button two mail notifications are sent (unless you have disabled them) – bid notification for administrator and for customer (and in some cases outbid note). If your mail server is slow, this can be a problem. Another cause might be slow server but in that case all requests will be slow. Email notifications are: outbid note, bid note, Customer bid notification. They can be disabled in WooCommerce Settings -> Emails.
-
I’m missing sealed bid checkbox in edit product details page but sealed auctions are enabled? – This happens when you have enabled proxy bidding by default for all auctions – then sealed bid option is disabled in product details.
-
I want to auto refresh page when future auction starts. What should I do? Obsolete – auction is automatically started using ajax.
-
I want to validate payment method for users / bidders and have role based bidding. What should I do? – We have released WooCommere Simple Auction Role Based Bidding and Payment Method Verification extension for these features you can purchase it here and check its documentation here.
Default role should be in above case ‘subscriber’ which then is changed to say ‘customer’. You can create also custom role say ‘bidder’ using some plugin for WordPress role management (like this one User Role Editor). To validate payment and enable user to bid create product with price say $0.01 and set its ID in WooCommere Simple Auction Role Based Bidding and Payment Method Verification extension config.
-
I want to export order(s) data. How can I do that? – There are plugins that allow exporting of various order data as CSV file which you can then import to some other software you use for order management. We can suggest this plugin Advanced Order Export For WooCommerce.
There is export for auction activity (CSV) and single auction history (CSV and Excel with sortable columns) in wp-admin.
-
Do you recommend any credit / wallet plugin for WooCommerce that works with this plugin? – Yes, you can use TeraWallet plugin which adds new credit payment gateway and works with our plugin just fine. Users or admins can top up wallet credit balance with regular payment gateways or manually.
-
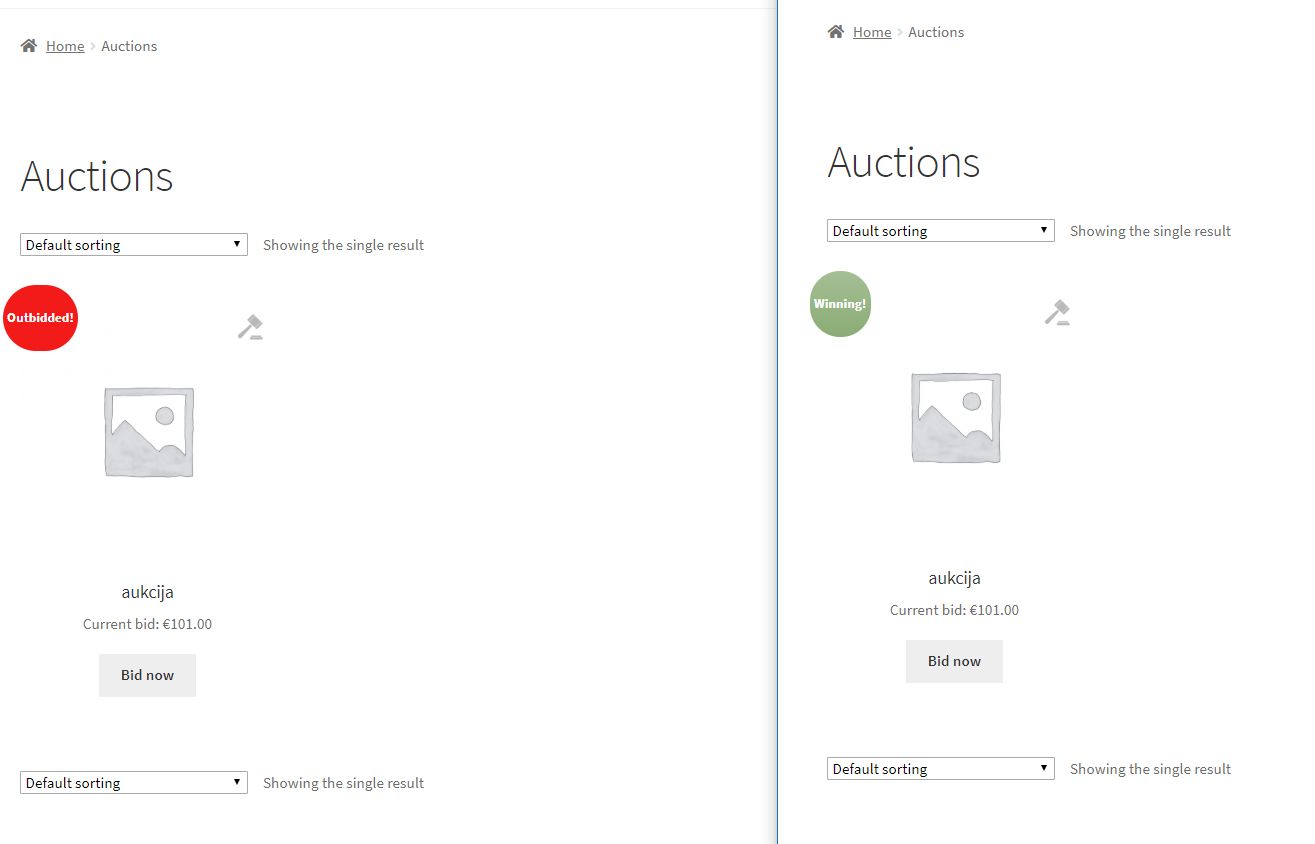
How can I show “Outbidded” message / badge to users who participated in auction? – You can use modified winning-badge.php template to accomplish that. See screenshot.
-
Is it possible to have proxy and normal bidding on same page? – Yes, we have simple modification for that. Open ticket and we will send you small plugin which allows this behaviour in Simple Auctions plugin.
-
How can I customize email notification? How can I add auction name to email notification subject? – You can do that using WooCommerce email notification filters. To add content in subject you can use following filter:
woocommerce_email_subject_ID
where ID is ID of the email notification. Check https://docs.woocommerce.com/document/change-email-subject-lines/ for complete reference. For example woocommerce_email_subject_auction_finished.
List of all WooCommerce Simple Auctions email IDs:
bid_note
auction_buy_now
auction_closing_soon
auction_fail
auction_finished
auction_relist_user
auction_relist
remind_to_pay
auction_win
customer_bid_note
reserve_fail
outbid_note
-
I can’t find sealed / silent auction option? – In order to enable sealed auctions please go to WooCommerce Settings > Auctions and first enable setting called “Enable sealed auctions”. After that you can go and publish auction, in new product screen you will have option to set auction as silent.
-
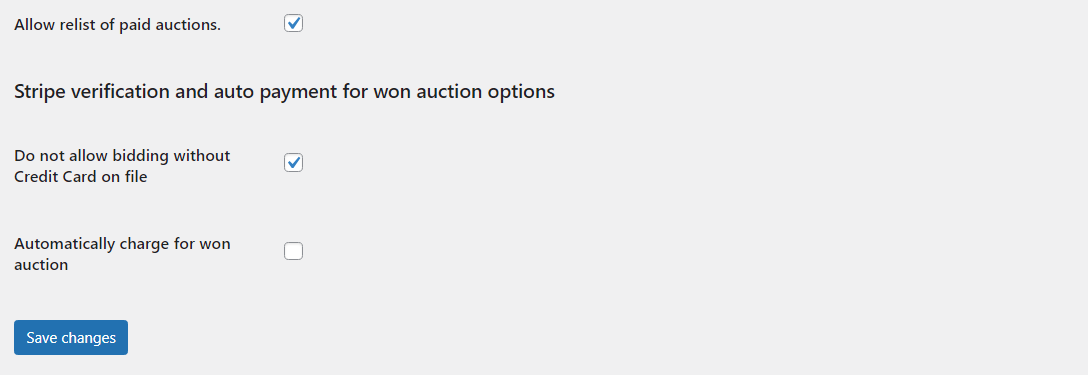
Can I relist paid auctions? – From version v2.1.3 you can relist paid auctions. First you need to enable option called “Allow relist of paid auctions” in Woo Settings > Auctions. After that all paid auctions will have relist button.
-
Can I output template parts using shortcodes? – Yes, from version v3.0 you can output parts of single auction template using shortcode [wsa_templates template=”countdown”] – this is useful for all visual builders except for Elementor (for which we have native widgets, but can be used here too). Available parts are:
add-to-cart
countdown
pay
bid-form
condition
dates
max-bid
reserve
auction-sealed
ajax-conteiner-start
ajax-conteiner-end
-
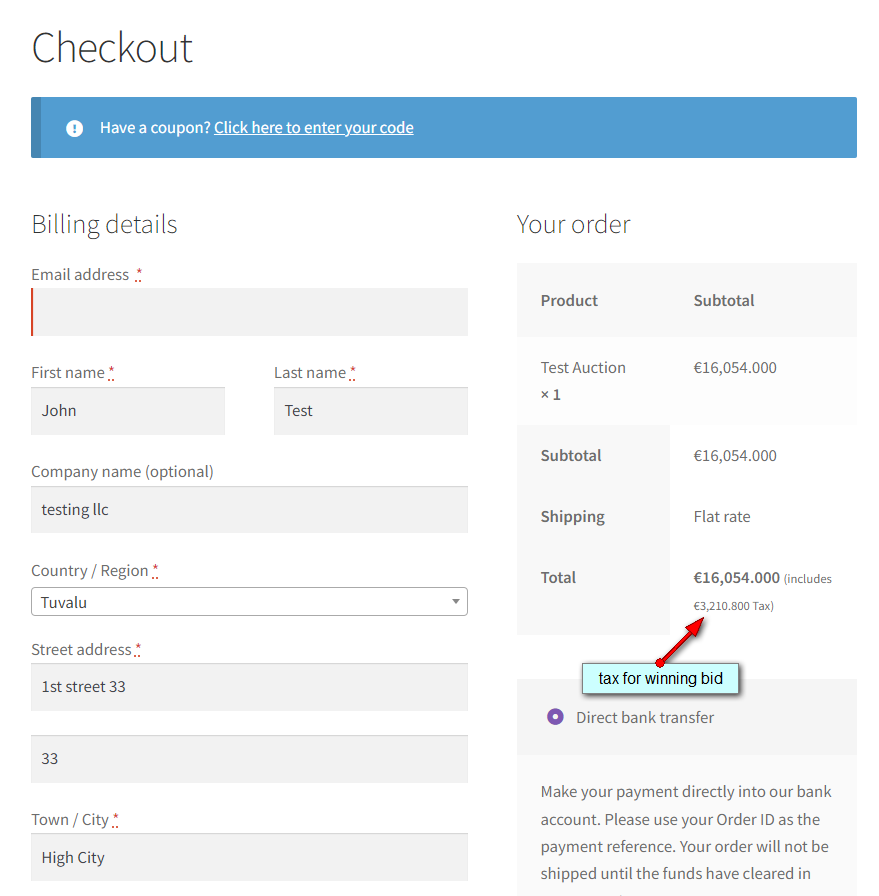
How can I set taxes for auctions? – You can normally set tax and once client go through checkout for won auction tax will be shown. See screenshot:
-
I’m using cache plugin in WordPress with option for persistent object cache – how should I setup it? – If you use object cache you will need to add group wsa_cache to a list of non presistent groups.
define( 'WP_REDIS_IGNORED_GROUPS', ['counts', 'plugins', 'wsa_cache'] );
Other plugins have similar option like https://objectcache.pro/docs/ignoring-groups/ or https://github.com/rhubarbgroup/redis-cache/wiki/Configuration-Options. WP Rocket, WP Super Cache and WP Fastest Cache do not use object cache (only page caching and that should be disabled for logged in users). On some hosting providers it is possible that hosting has set up serverwide object cache (in order to have as much clients as possible on same hardware resources) and if you experience issues you might have to check with your hosting support if something like that is implemented in their hosting enviroment.
We use wp_object_cache functions which by default is non-persistent. This means that data stored in the cache resides in memory only and only for the duration of the request. Cached data will not be stored persistently across page loads unless you install a persistent caching plugin.
When you install 3rd party object cache, you override this cache and you get persistent object cache. That is why we suggest excluding wc_lottery domain from it. We do this to avoid duplicate SQL queries in same request. So default behaviour is that cache is valid only for single request (non persistent).

