Due to recent policy updates on CodeCanyon requiring all authors to be non-exclusive, we have adjusted our pricing on their platformand launched our own store
Due to recent policy updates on CodeCanyon requiring all authors to operate on a non-exclusive basis, we have updated the pricing of our plugins on the marketplace.
While the plugins remain exactly the same in functionality, updates, and quality, this change has allowed us to launch our own store and sell plugins directly at wpgenie.org.
All existing CodeCanyon customers will continue to receive full support and regular updates as usual, with no changes to their current licenses or access.
Same Plugins Now Available Directly from WPGenie
In addition to CodeCanyon, our plugins are now also available directly from our official store. Customers can now access the same plugins at a lower price compared to the marketplace, along with direct access to our support ticket system.
What This Means for Customers
The plugins available on WPGenie.org are the same plugins previously sold on CodeCanyon
Existing CodeCanyon customers will continue receiving updates and support
New customers can choose between CodeCanyon or direct purchase from WPGenie
Direct purchases include original lower pricing, with automatic access to our support ticket system
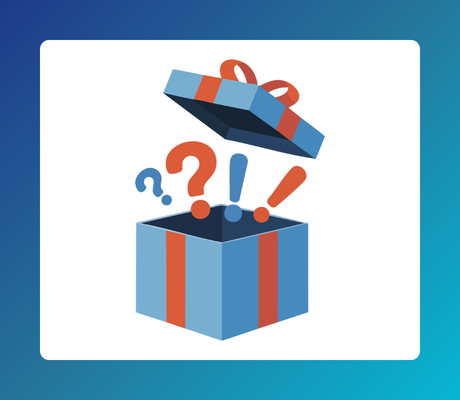
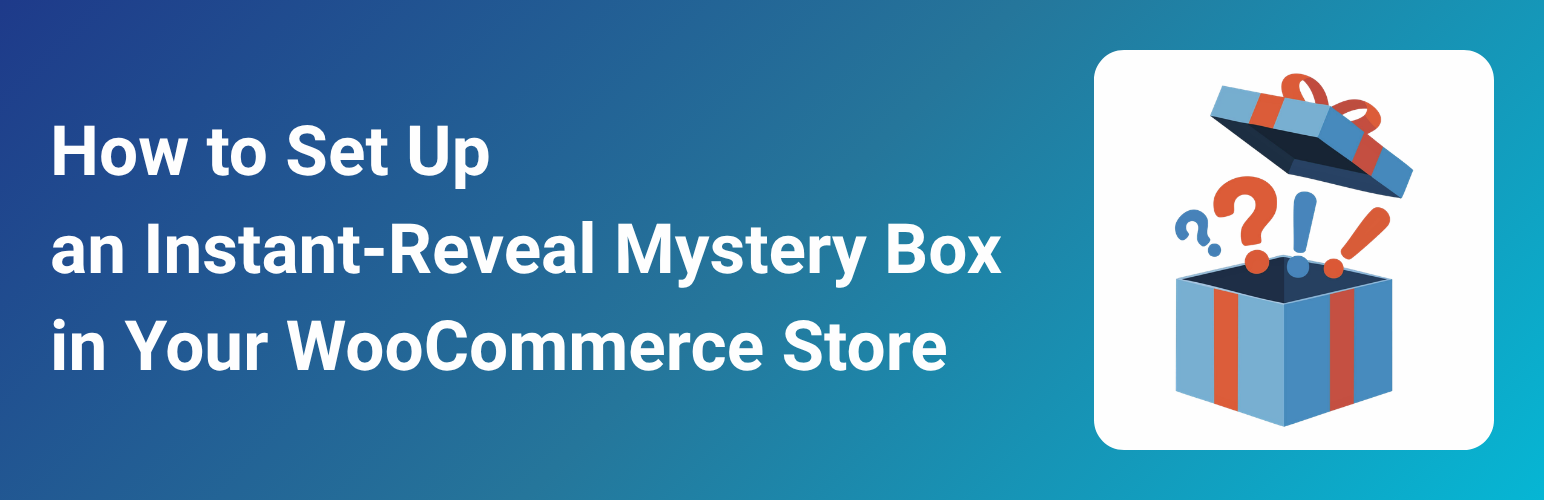
Instant-reveal mystery boxes are a highly effective, easy-to-implement gamification strategy that can boost engagement, clear inventory, and drive repeat purchases in yourWooCommerce store
Mystery boxes have been extremely popular for the past few years, but as a concept they have a surprisingly long history. Some trace their origin to “grab bags” and “lucky dips” of Victorian-era fairs and markets, while others find their direct cultural ancestor in Japan’s fukubukuro (“lucky bag”) tradition. In any case, it is clear that they have proven to be more than just a passing trend.
What is the secret behind their popularity and longevity? For store owners, they are a powerful marketing engine, and the main reason is one of the perks of human psychology: we love the thrill of not knowing what we’ll get. When customers buy a mystery box, they aren’t just buying a product, they’re buying an experience.
Over their evolution, mystery boxes have come in different forms, from collector boxes of the mid-20th century to the modern mystery box boom that started around 2010, with the explosion of YouTube unboxing videos.
The newest trend blending gamification with retail is the instant-reveal mystery box, where you purchase a box and then immediately after watch a “virtual unboxing” animation (and, on some websites, trade or sell back unwanted digital or physical items).
In this article, we’ll explain what instant-reveal mystery boxes are and what their key benefits are for store owners. We’ll show you how to set up a mystery box in WooCommerce using the Mysterx – Mystery Boxes for WooCommerce plugin, and share a simple way to offer mystery boxes as free gifts to your customers.
Table of Contents
What is an instant-reveal mystery box?
An instant-revealmystery box is a digital gamified shopping experience where you purchase a box of possible items through an e-commerce website or app at a set price, and you don’t know which one you’ll get until you “open” it digitally.
The instant-reveal mystery box evolved from two major trends over the last decade: video game loot boxes and physical mystery boxes. Instant-reveal mystery boxes essentially merge these two ideas. There’s the instant gratification and high-production-value animations of gaming software, but instead of winning virtual items like video game skins or armor, the customer gets a real product from the store’s catalog, drawn at random from the items in the box. Of course, stores selling digital goods can use the same mechanic to deliver virtual items instead.
Key Benefits for Stores
Here are the main benefits of offering instant-reveal mystery boxes in your store:
Benefit
How It Helps Your Store
Drives repeat purchases
Customers who enjoy the unboxing, or didn’t get the item they hoped for, often buy another box, turning one sale into several
Boosts customer engagement
Curiosity and anticipation drive repeat visits: customers browse the available items before buying and look forward to the unboxing animation
Creates strong value perception
A fairly priced box means customers always receive an item worth at least what they paid, and sometimes far more, which fuels word-of-mouth
Drives product discovery
Customers receive and actually try products they would never have clicked on, giving new or overlooked items real exposure
Clears slow-moving inventory
Gives slow sellers and end-of-season products a second chance by placing them in the box pool, moving inventory without resorting to discounts that erode your brand
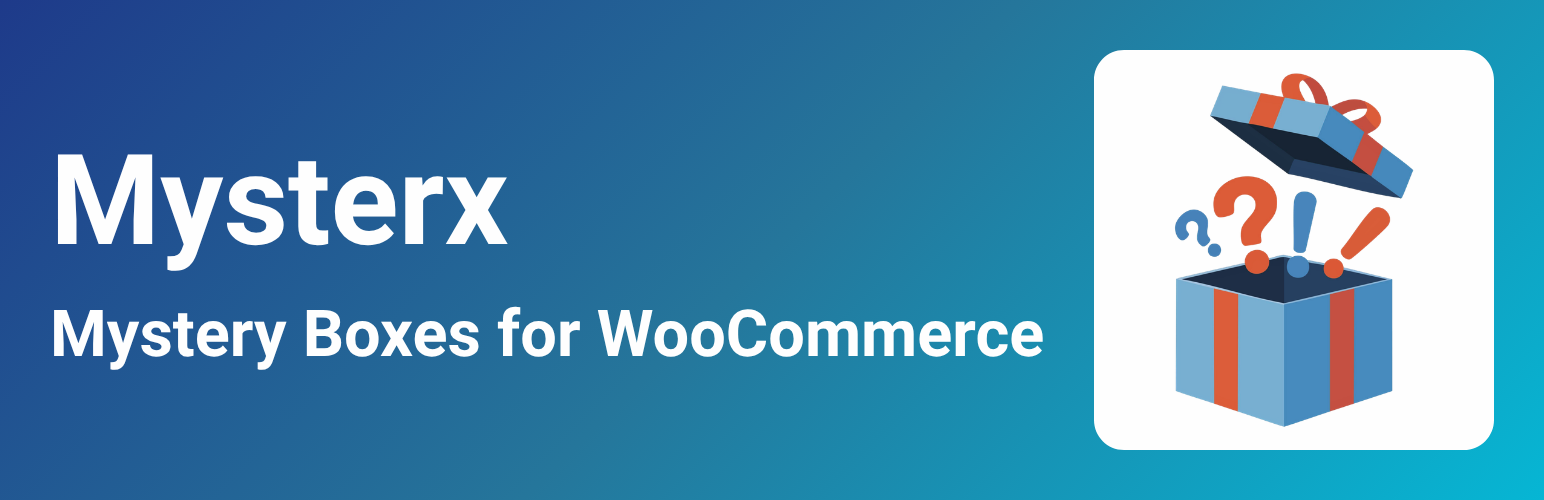
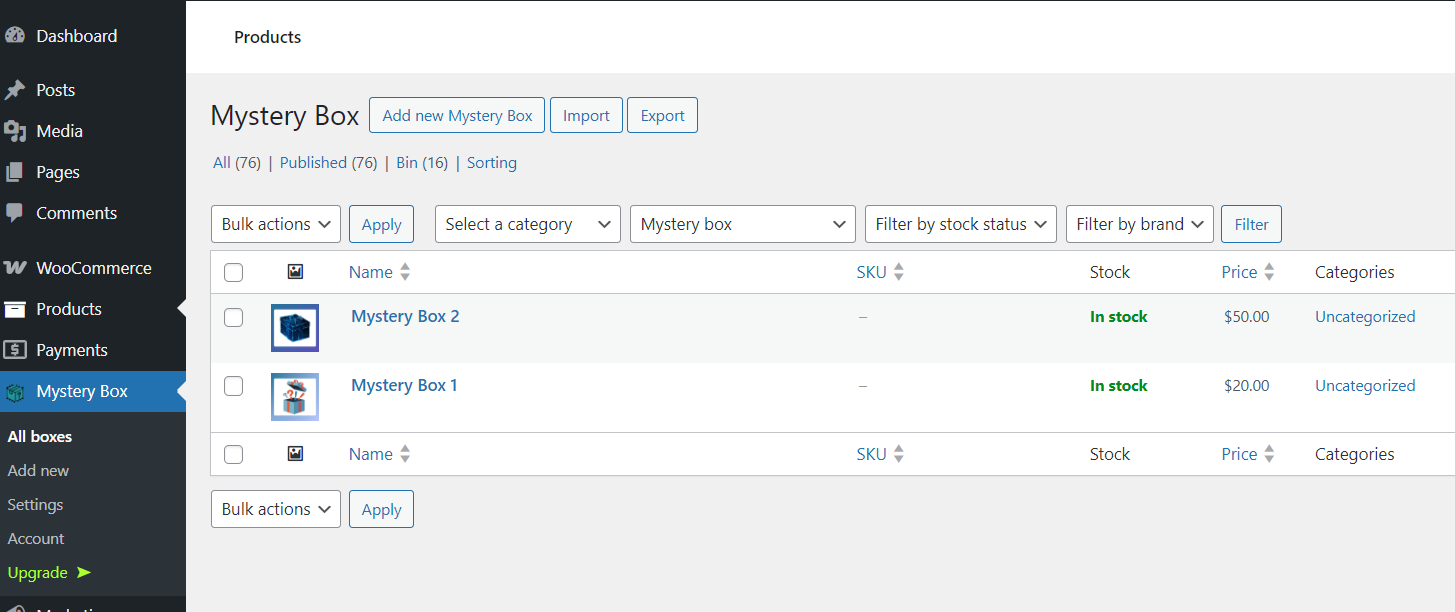
Mysterx: An Instant-RevealMystery Box Plugin for WooCommerce
If you want to offer instant-reveal mystery boxes in your WooCommerce store, there’s an easy way to do it. You can use WPGenie’s Mysterx – Mystery Boxes for WooCommerce plugin, available in free and PRO versions.
Mysterx lets store owners easily create and sell instant-reveal mystery boxes, each containing a curated selection of products defined by the seller. Customers can see all items in the box before buying, but won’t know which one they’ll get until the on-screen unboxing animation reveals it.
You can use this plugin to:
Sell instant-reveal mystery boxes or blind boxes as standalone products
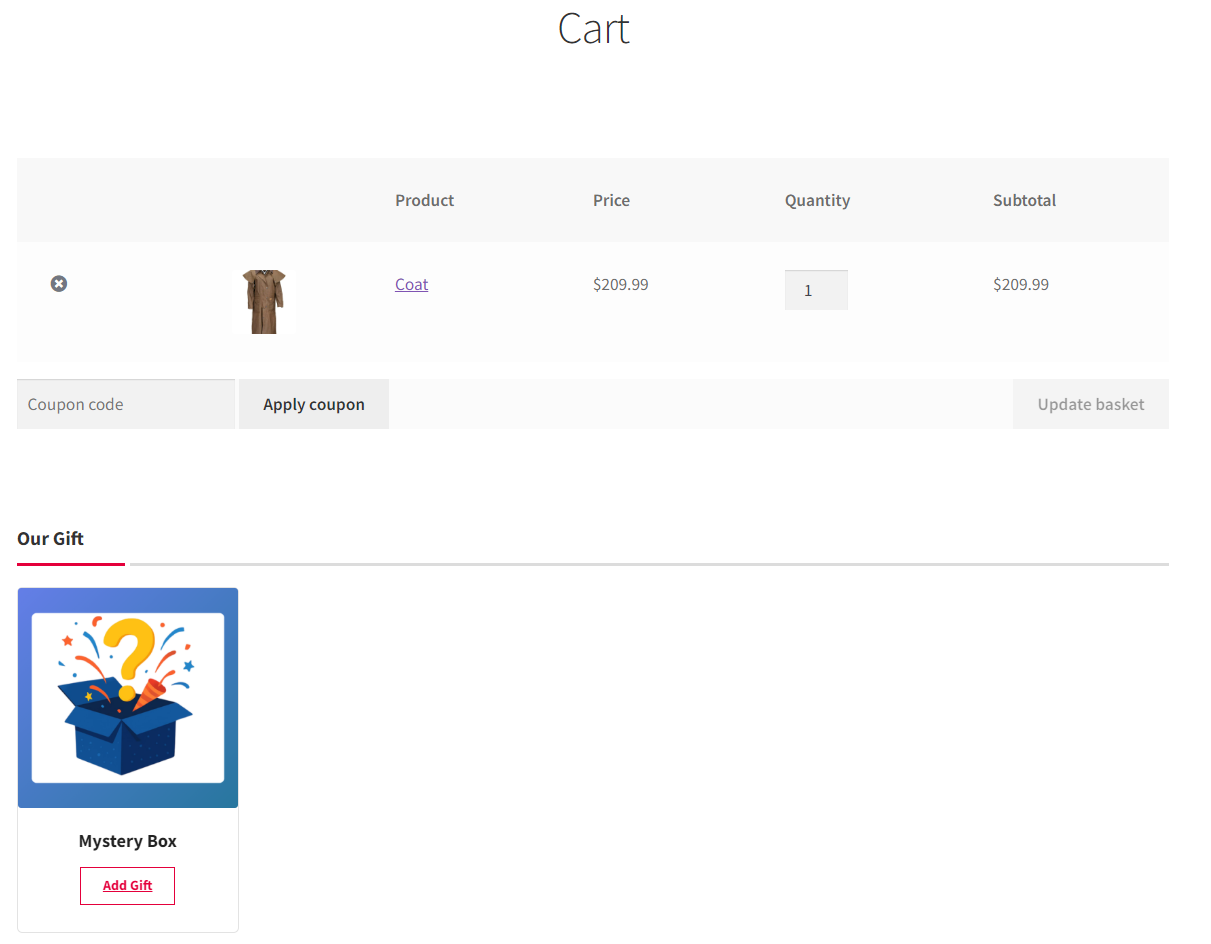
Offer a free mystery box as a thank-you for a purchase (you’ll need a “free gift” plugin)
How Mysterx Works
Mysterx – Mystery Boxes for WooCommerce adds a custom ‘Mystery Box’ product type to WooCommerce.
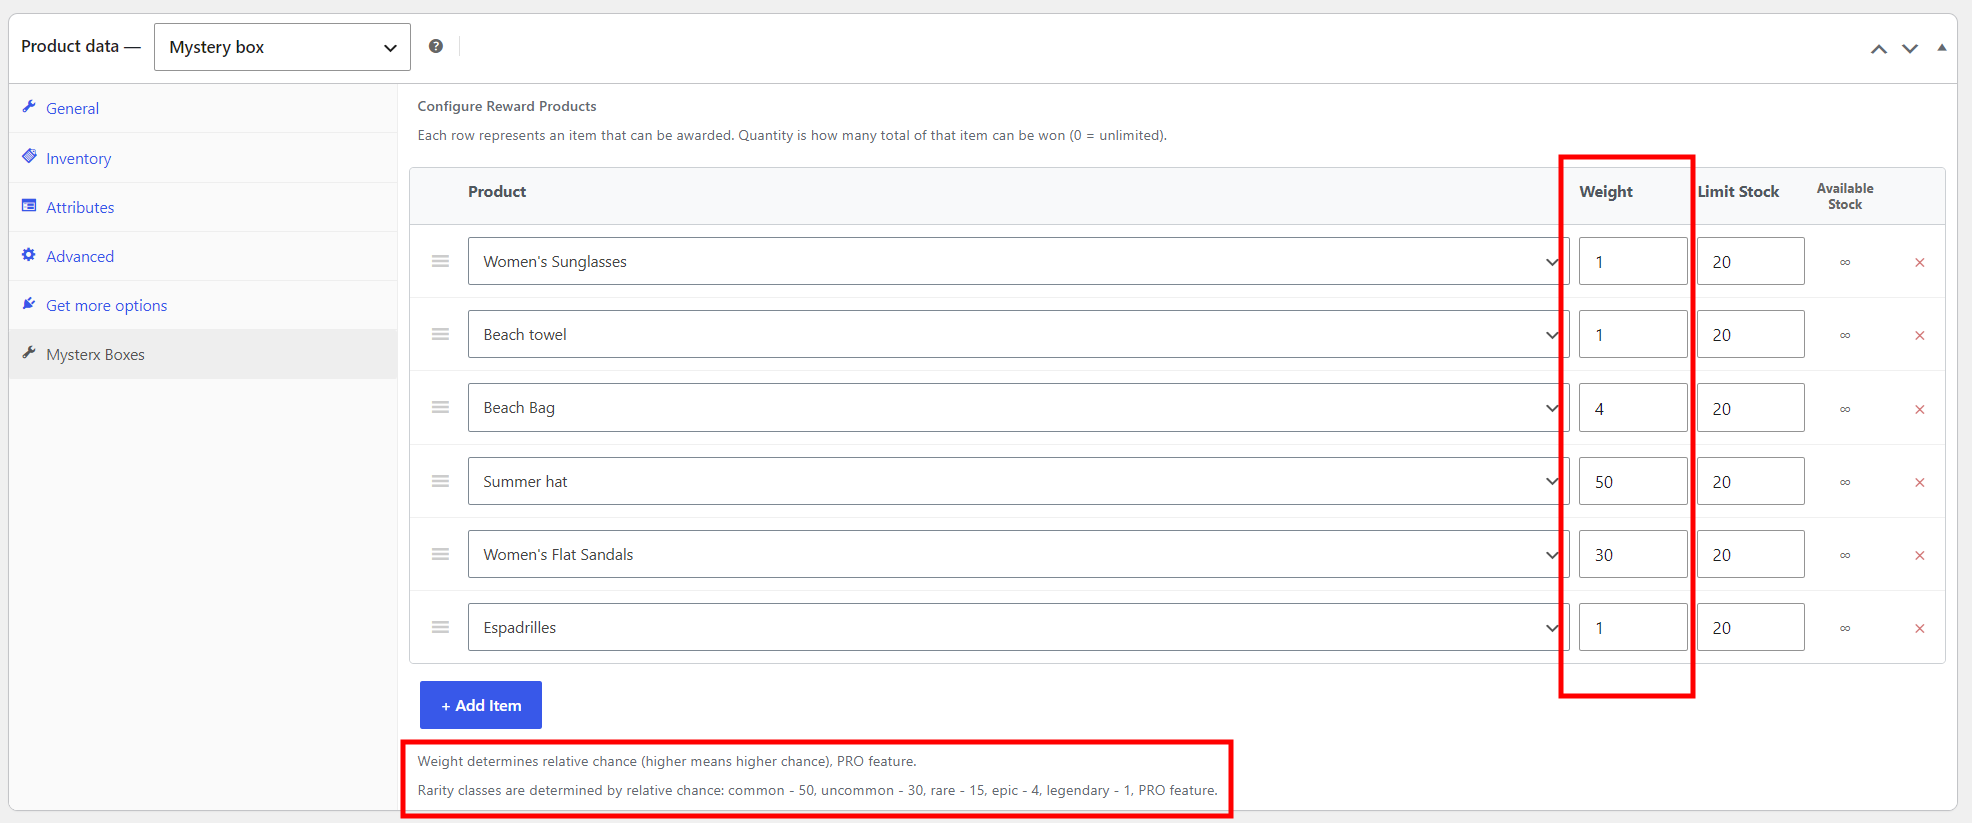
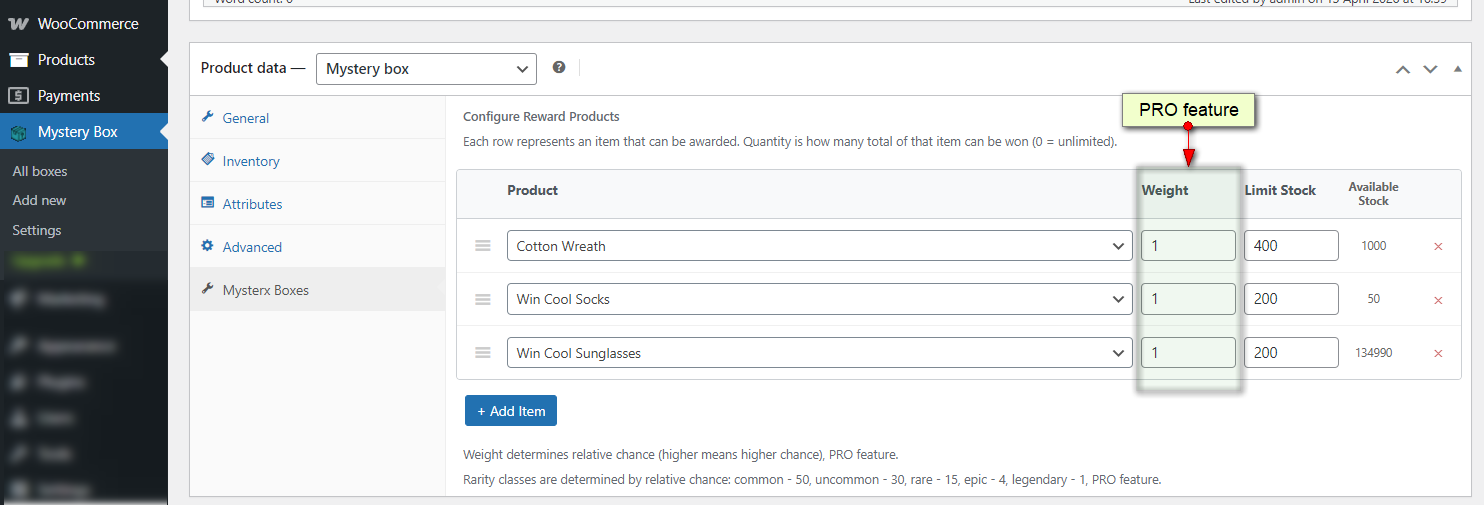
Store owners need to configure each box by defining the box price and then selecting the products they wish to include in the box. They can add as many products as they want to a single box and set stock levels for each item.
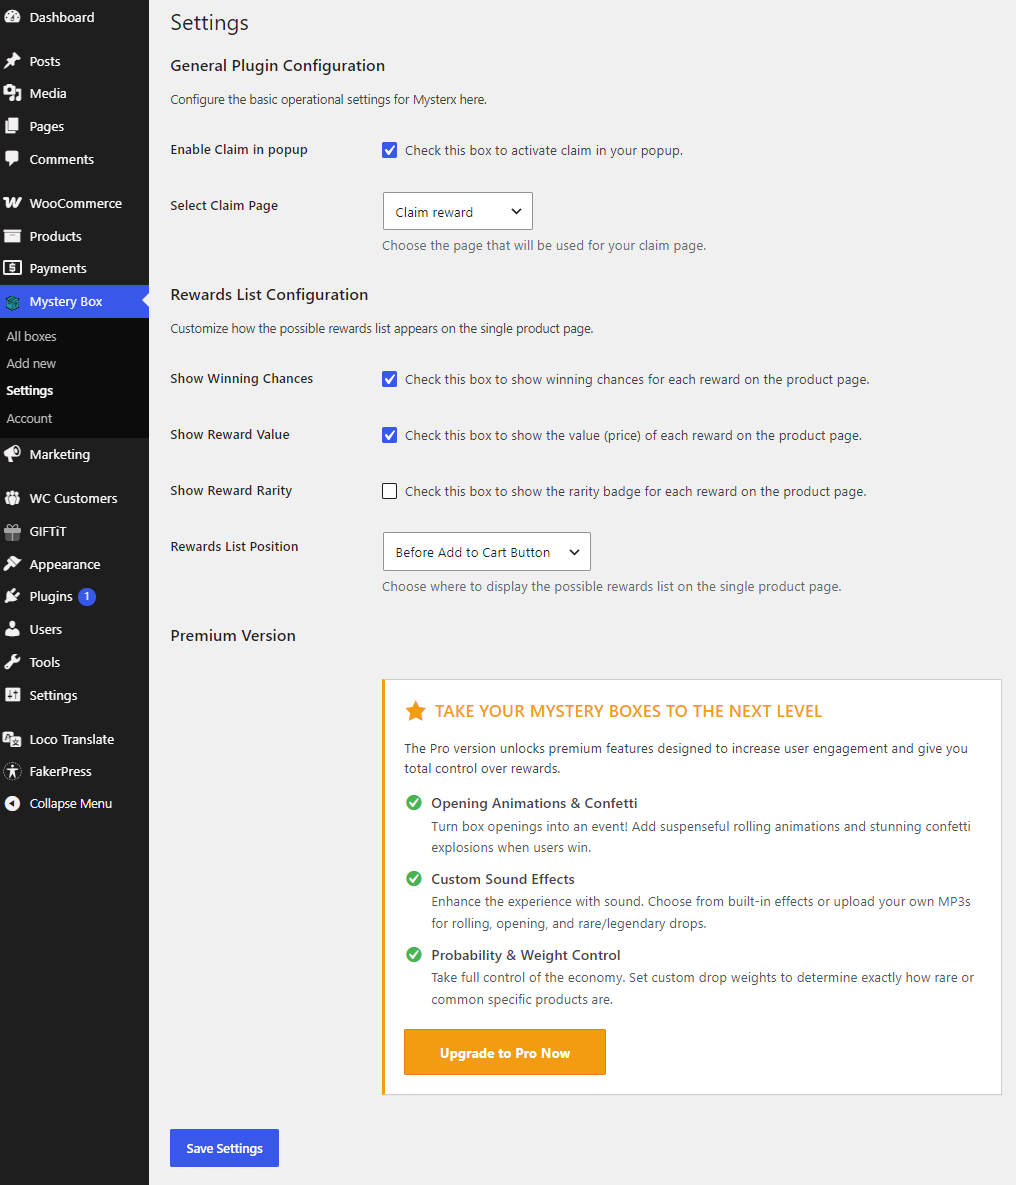
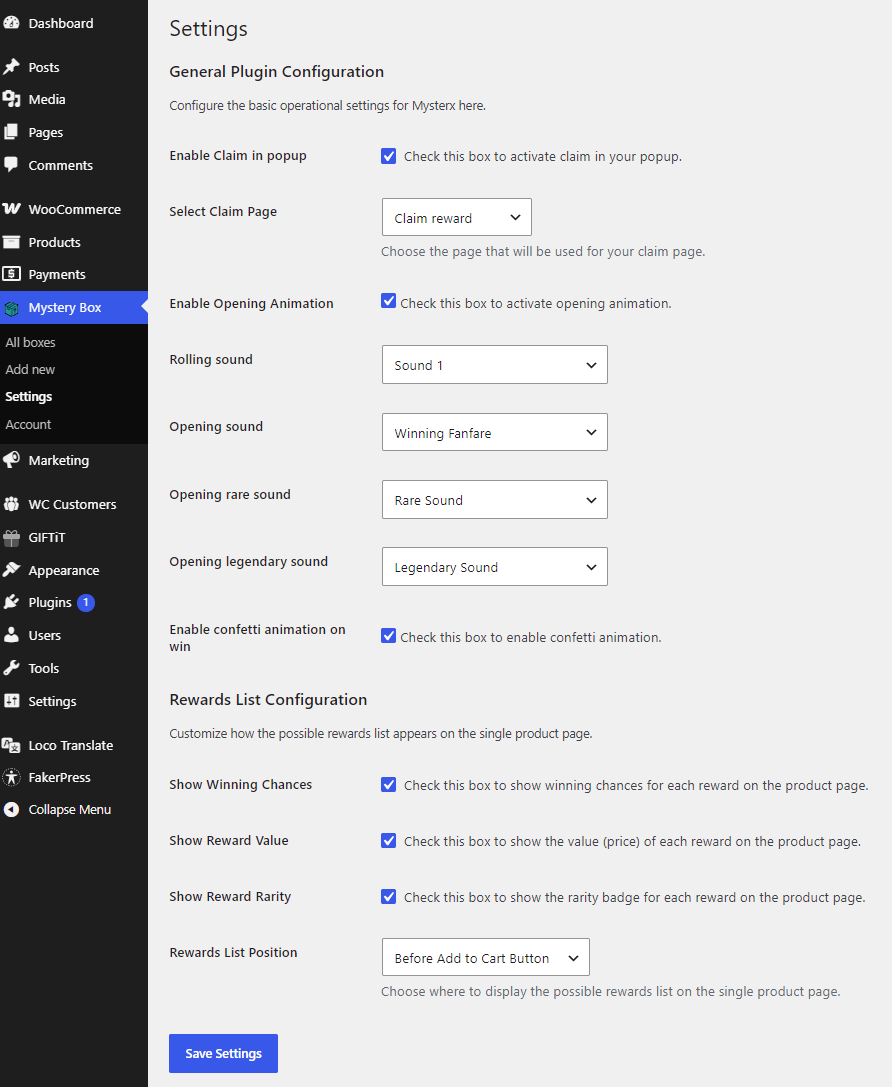
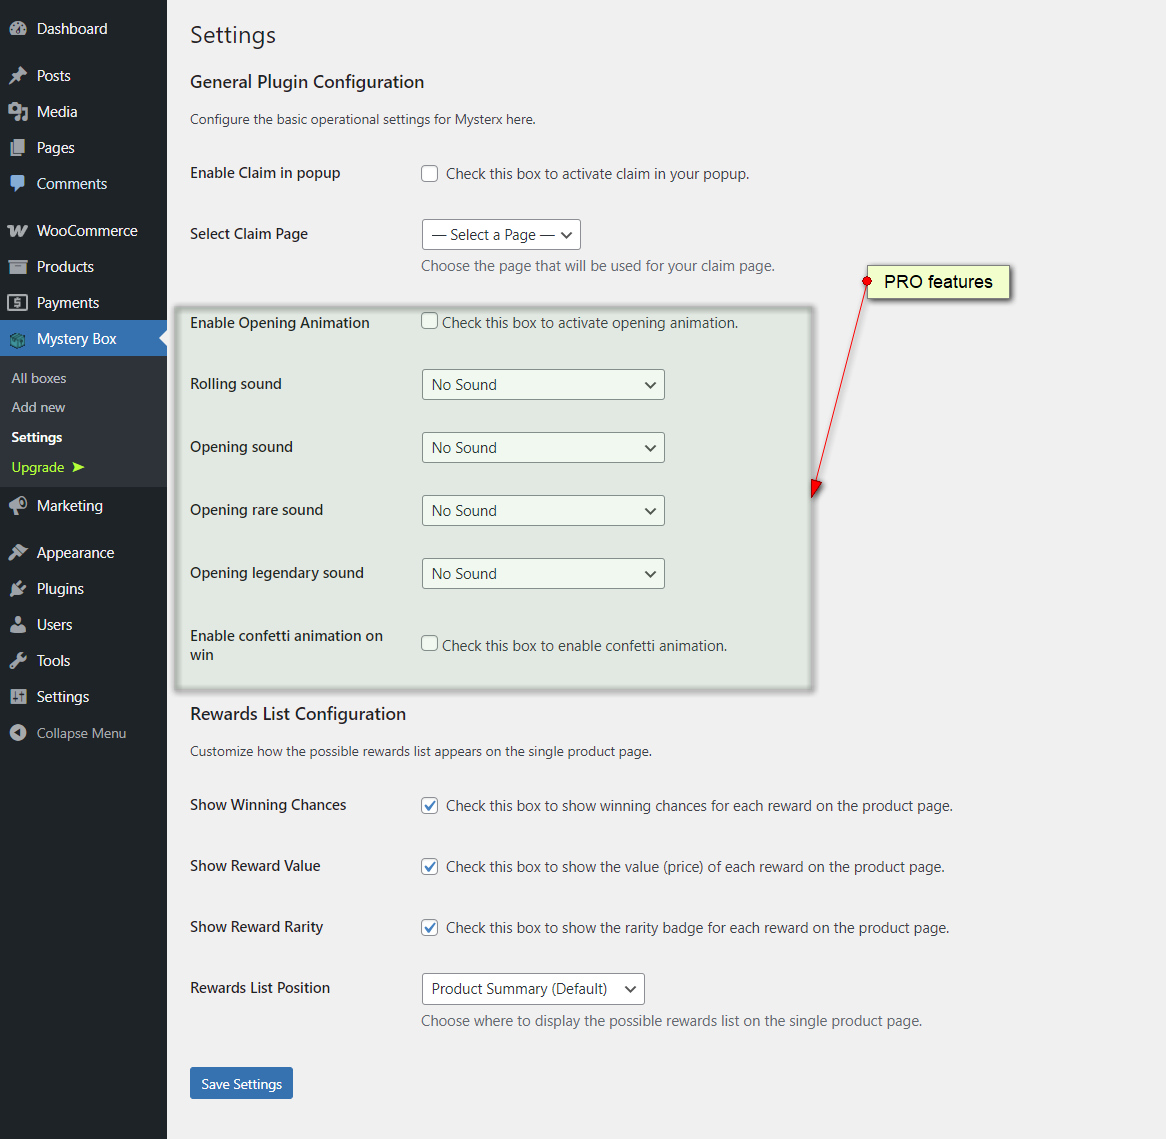
A new “Mystery Box” menu is added to the main WP Admin menu, and through it you can access Mysterx settings.
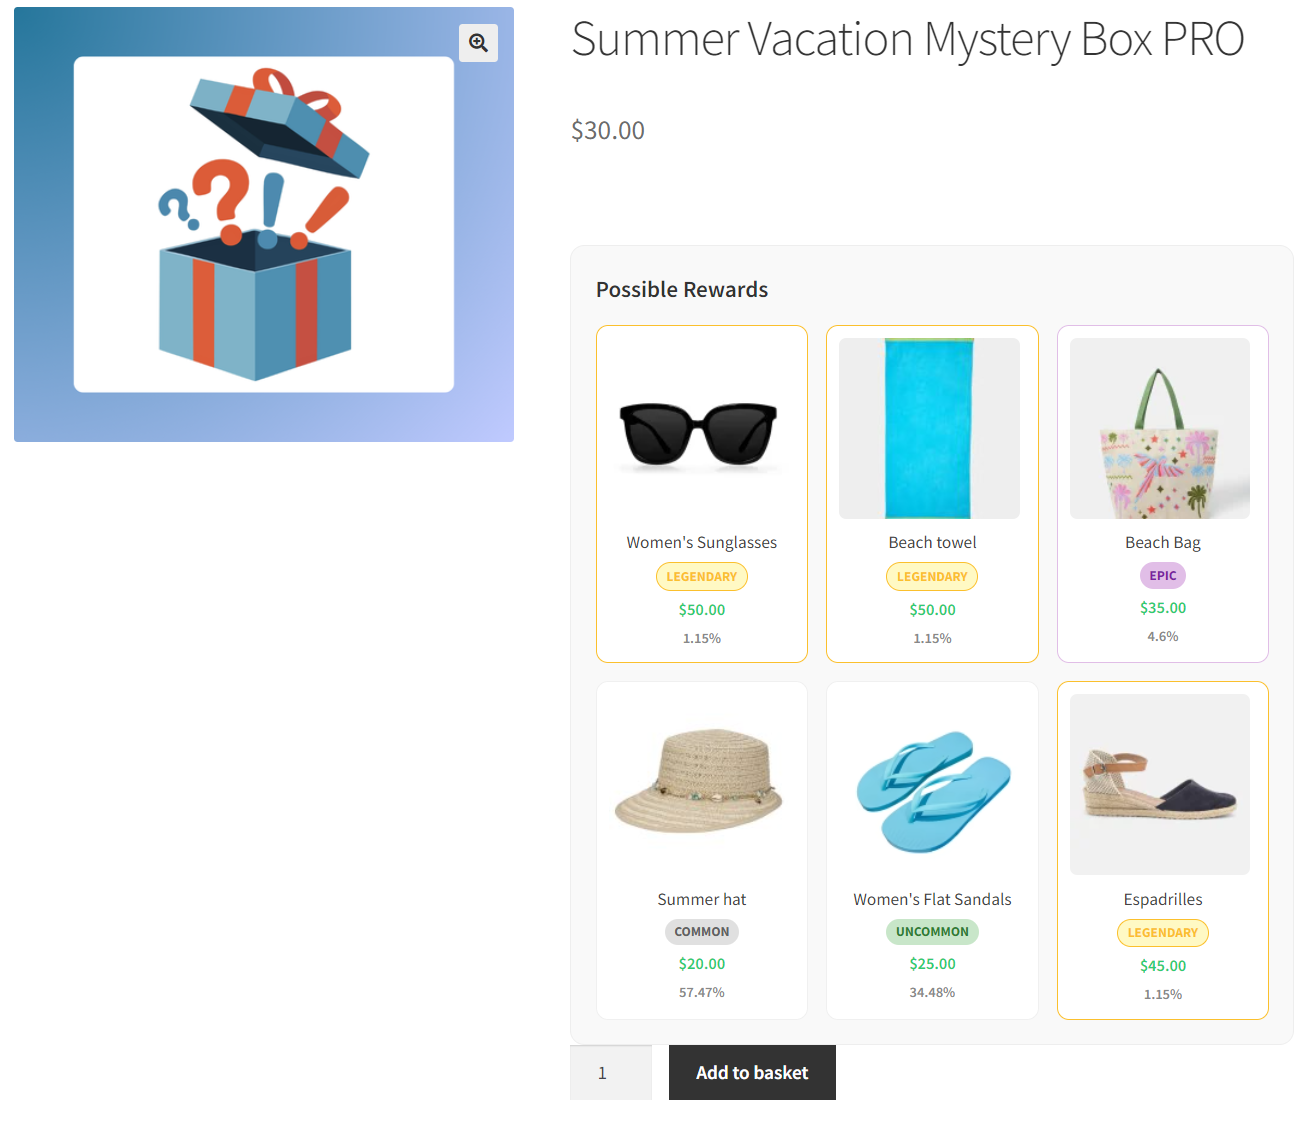
There is an option to activate claim popup and select a claim page. There are also options to customize how the list of possible items appears on the single product page. You can choose to display the value (price) of each item included in the box, as well as control the position of the items list: before or after the Add to Cart button, or before or after the product summary.
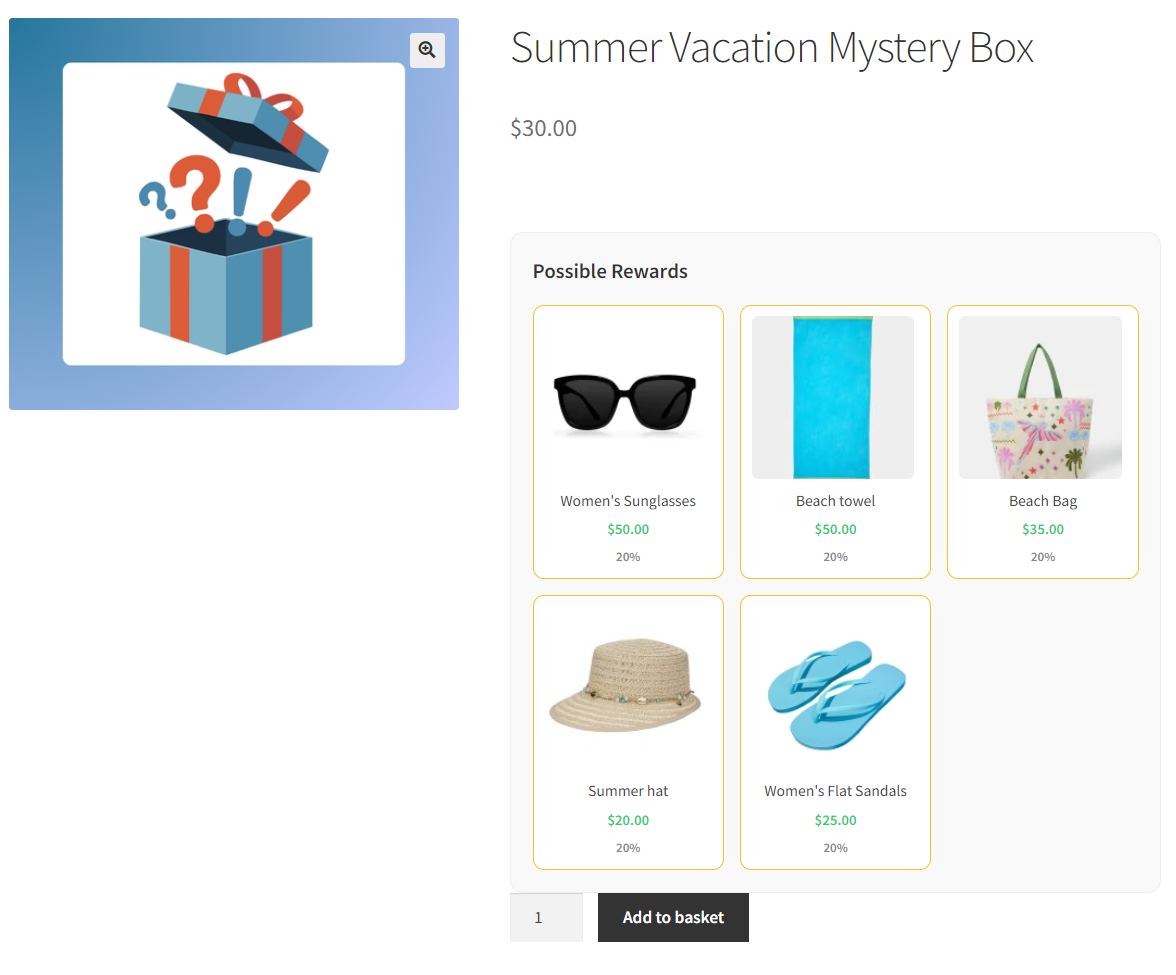
On the frontend, customers can see the list of possible items in the box, and there’s also an option to show them the value (price) of each product in the box.
Mysterx menu in WP admin and Product data – Mystery box where store owners need to configure the box
Mystery box – Settings(free version)
Frontend: Mystery box with list of possible items, prices and winning chances (equal for all items in free version)
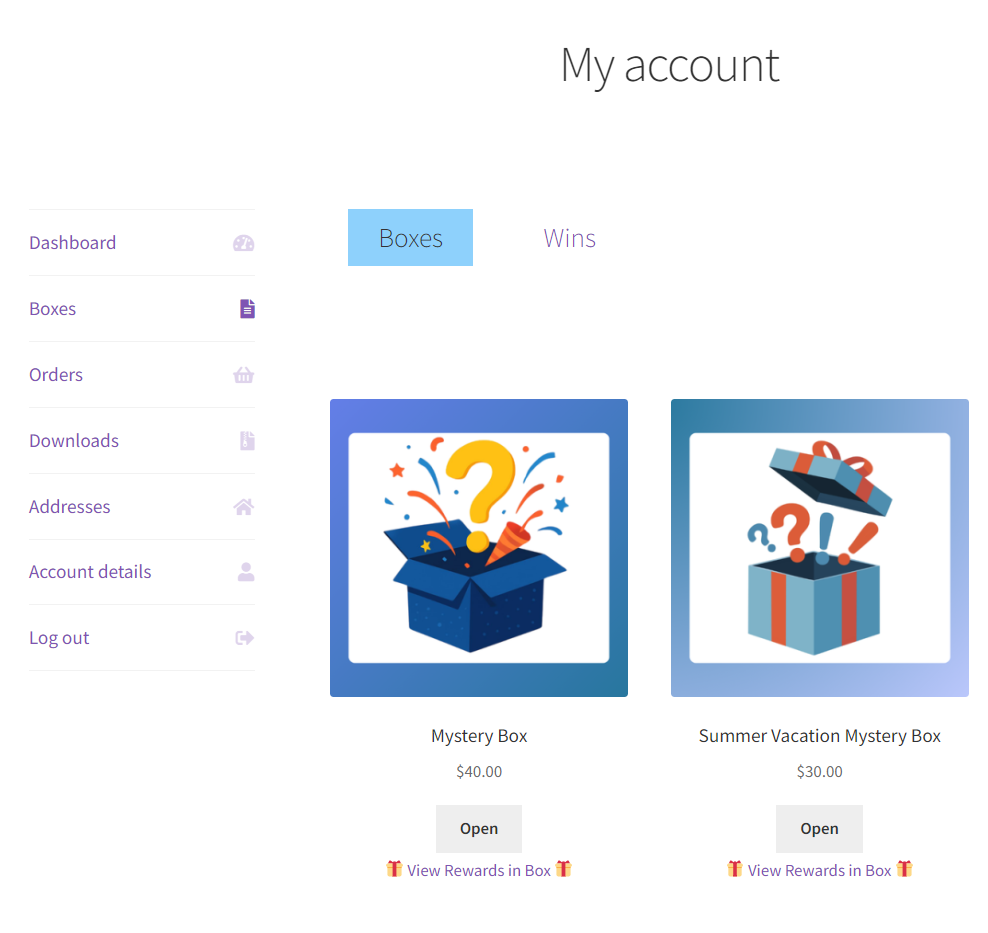
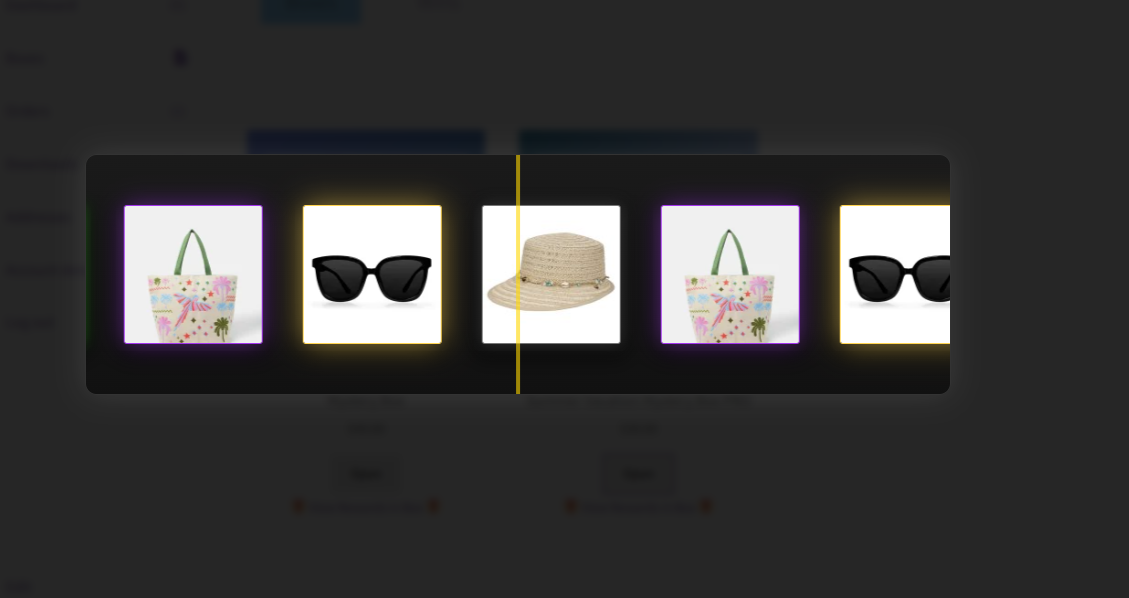
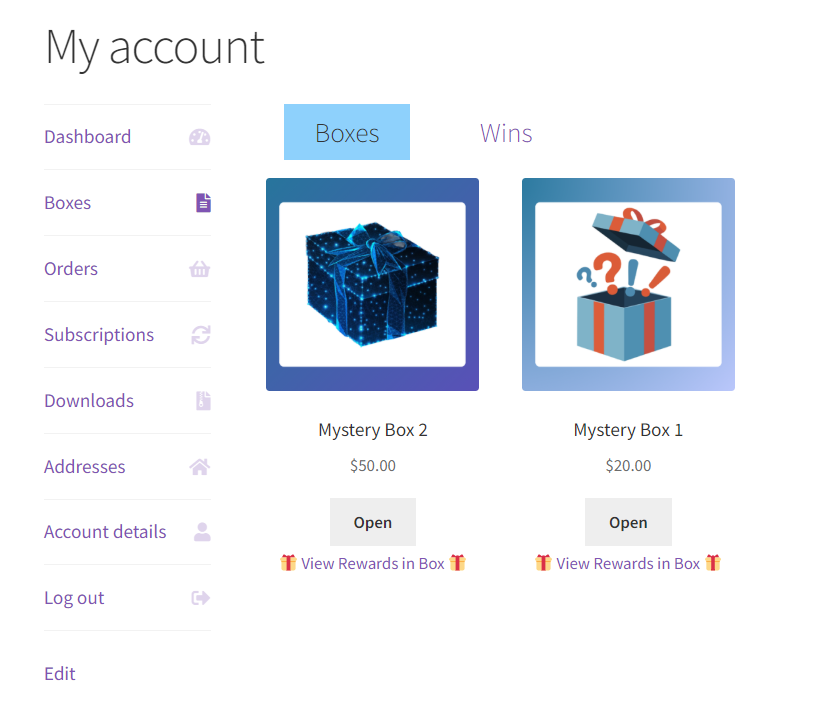
Customers buy an instant-reveal mystery box, and after the order is completed they get an “Open your Mystery Boxes” link on the order thank-you page, which takes them to My Account > Boxes. From there, customers can instantly open their box and find out which product they got.
For one mystery box purchase only one product can be received. This product is chosen at random from the items in the box. Mysterx handles the random selection automatically and deducts the correct item from stores actual inventory.
In My Account > Boxes, customers can also track unopened boxes and view all the products they’ve received.
Frontend: My Account – Boxes, before opening
Frontend: My Account – Boxes, digital unboxing
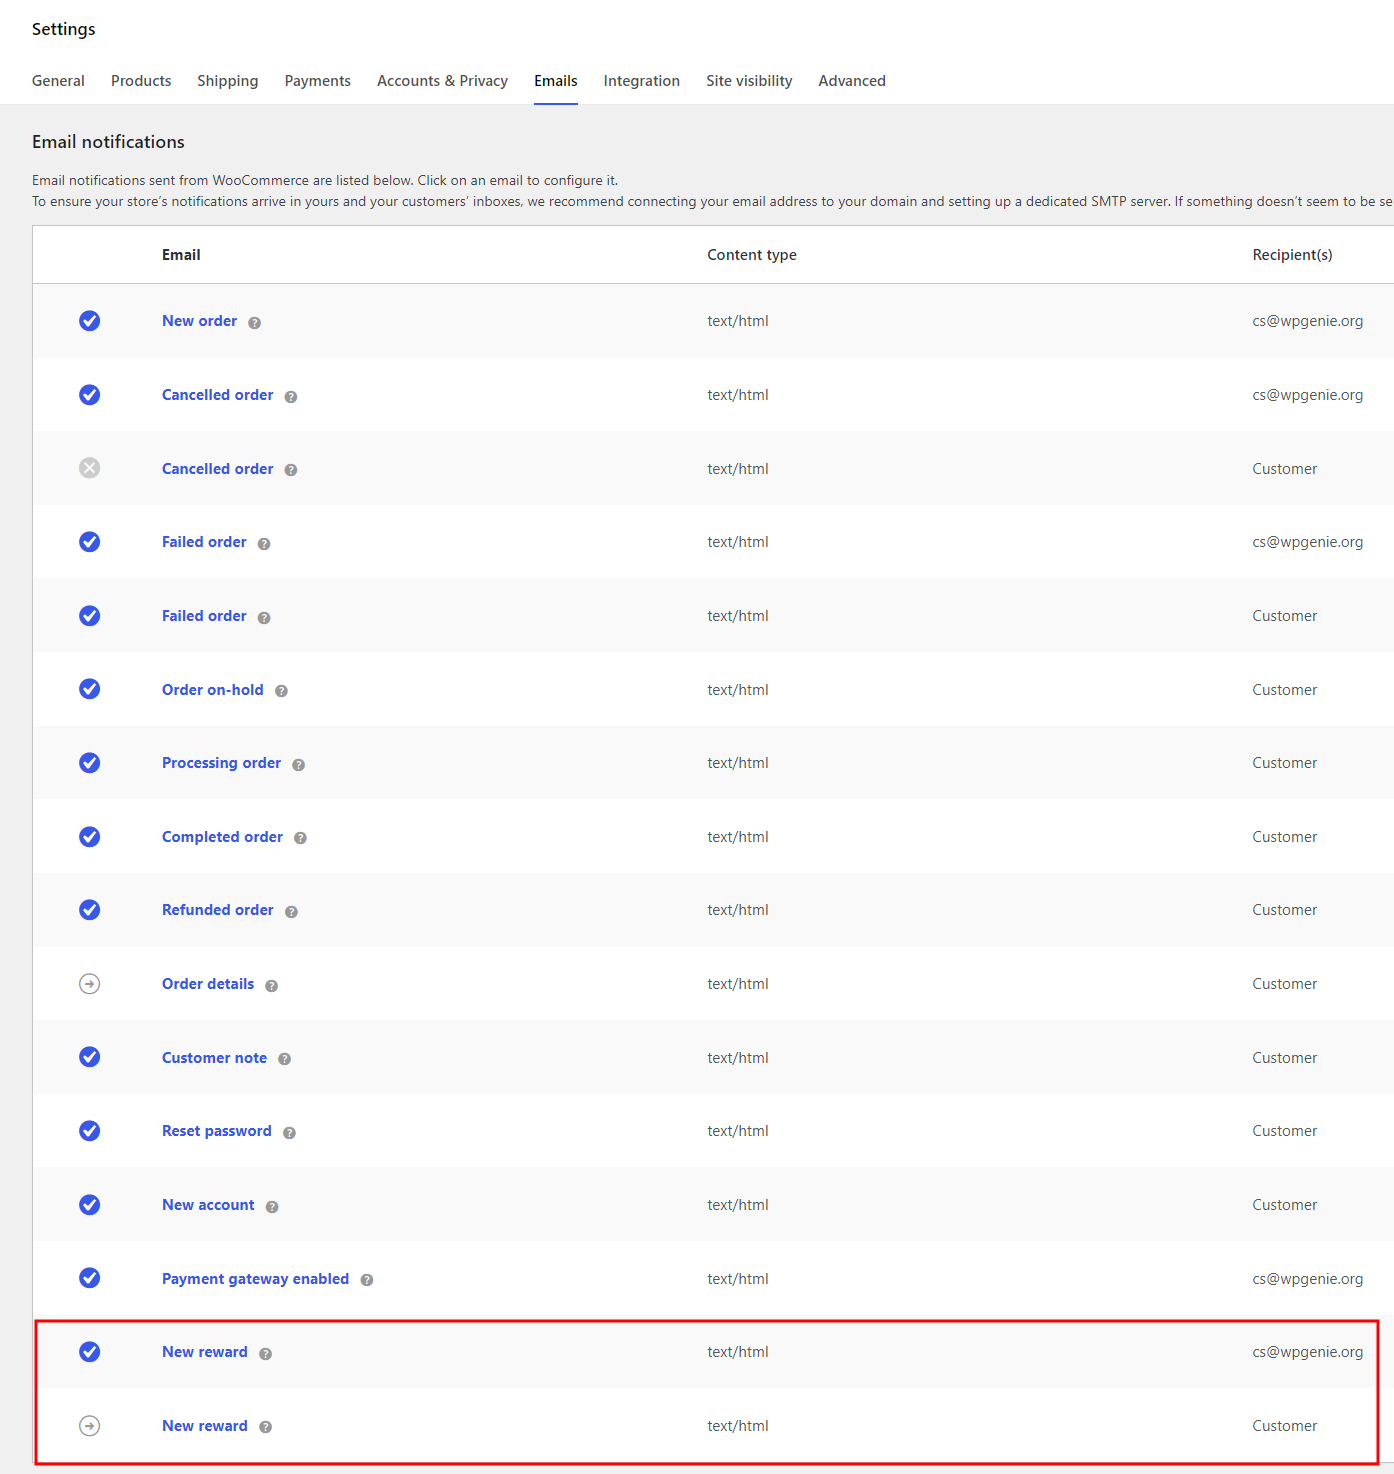
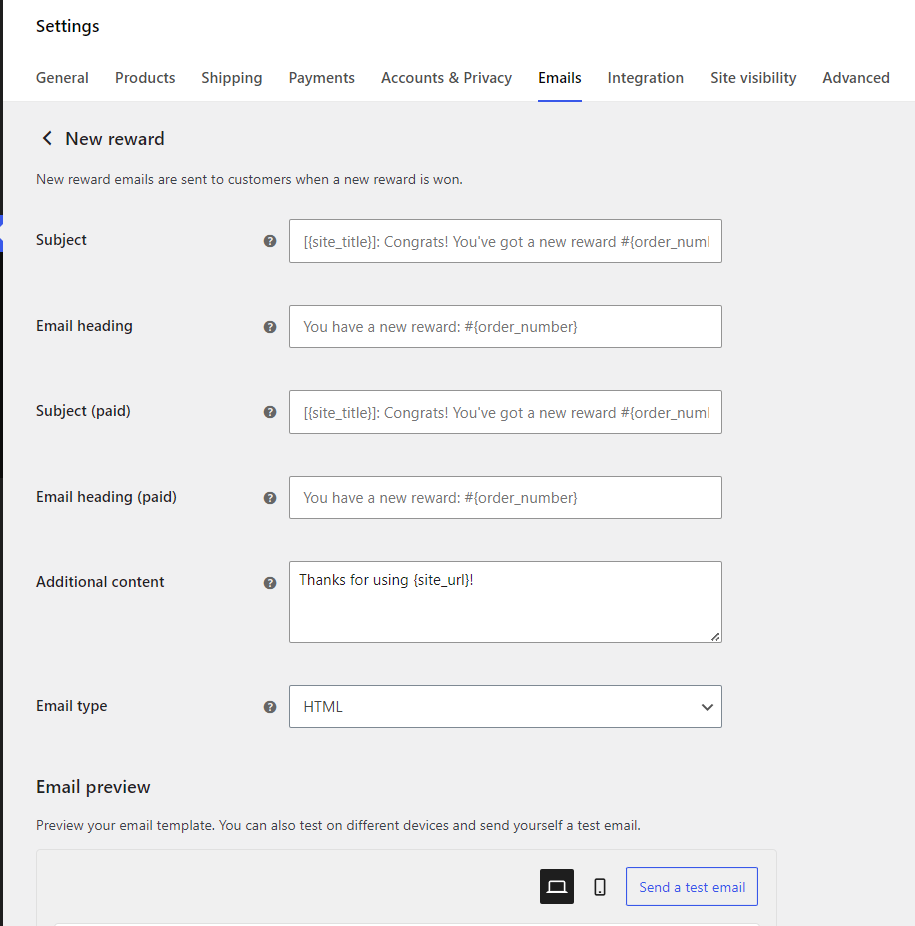
Mysterx also sends email notifications when a box is opened, one to the customer confirming what they got, and one to the store admin.
New reward email notification for website admin and for customer
Example of New reward email notification for customer
PRO version features
The PRO version offers additional features for user engagement and probability control:
Opening Animation & Confetti On Win
Adds game-style reveal animation for the opening and fun confetti animation when the prize is revealed.
Custom Sound Effects
Chooses from built-in effects or upload your own audio for spinning, opening, rare item reveal, and legendary item reveal.
Probability & Weight Control
Sets custom item weights to control exactly how “rare” or “common” specific products are. Weight determines the relative chance of getting a product: higher weight means a customer has a bigger chance of getting it.
Premium Support Direct access to the WPGenie ticket support system at wpgenie.org/support.
Frontend: Mystery box with list of possible items, with price, winning chances (determined by weight) and items rarity badge(PRO features)
Digital unboxing – opening animation(PRO feature)
Mysterx PRO: Product data with weight control (chance of winning the product)
Mysterx PRO – Settings
Instant-Reveal Mystery Box as a Gift to Customers
A free gift is one of the simplest ways to make a purchase feel special.
An instant-reveal mystery box makes an especially good gift because the gift itself is an experience: the customer gets to open a box and discover their reward, which adds a moment of genuine fun to the end of their purchase.
Create a mystery box as you normally would, then set it as a free gift that’s added to the customer’s order when they meet your conditions, for example, spending over a certain amount.
A few ideas for using this:
Reward orders above a spending threshold (great for raising order value)
Thank first-time customers with a small welcome box
Add a surprise box to orders during holiday campaigns
Conclusion
Instant-reveal mystery boxes combine anticipation, surprise, and instant digital unboxing into a single shopping experience. They’re a highly effective, low-effort strategy for WooCommerce stores to drive customer excitement and repeat interest.
With Mysterx – Mystery Boxes for WooCommerce plugin, you can add instant-reveal boxes to your store in a few minutes.
The free version of Mysterx is available on WordPress.org. For spinner animations, custom sounds, and item weight control, install the free version and then upgrade to PRO version.
An instant-reveal mystery box is a gamified shopping experience where you pay a set price for a box of possible items, and you don’t know which one you’ll get until you open it digitally. It combines video game loot boxes and physical mystery boxes into one format.
How do I add an instant-reveal mystery box to WooCommerce store?
The easiest way is with a dedicated plugin like Mysterx – Mystery Boxes for WooCommerce, which adds a “Mystery Box” product type to your store. You select the products that can be inside the box, set the price, and customers open the box on screen after purchase to see which item they got. Mysterx comes in a free and a PRO version.
Do customers know the value of products inside mystery box?
It depends on how the store owner sets up the box. Mysterx – Mystery boxes for WooCommerce lets store owners choose whether to display the value (price) of each possible item on the product page, so customers can see exactly what’s inside and what it’s worth before buying.
Are mystery box contents random, or does the store owner choose them?
The store owner chooses them. When setting up an instant-reveal mystery box with Mysterx, the store owner creates the list of products that appear inside the box.
How does the plugin pick the winning item?
When a customer opens a box, the plugin randomly selects one product from the items the store owner added. In the free version, every item has an equal chance of being picked. In the PRO version, store owners can assign weights to make some items rarer than others.
Can I set the winning probability for each product in a mystery box?
PRO adds weight control, which determines the relative chance of winning a product: a higher weight means a customer has a greater chance of getting it. This way, you can make a high-value item appear less often than everyday items and protect your margins. In the free version, every item in the box has an equal chance of being won.
Can I gift a mystery box to customers?
Yes, you can offer an instant-reveal mystery box as a free gift. It’s an excellent way to make a purchase feel special, reward loyal customers, and add a moment of fun to the checkout. To set it up, you’ll need the Mysterx plugin plus a free gift plugin for WooCommerce, such as Free Gift for WooCommerce.
Looking for other ways to improve your WooCommerce store? Check the complete list of our plugins that can help you bring your clients the best online shopping experience!
You can buy WooCommerce Simple Auctions or its add-ons (Seated Auctions, Buy Bid Credits, and Role Base Bidding) in WPGenie’s Store.
Looking for other ways to improve your WooCommerce store? Check the complete list of our plugins that can help you bring your clients the best online shopping experience!
Connect your WooCommerce store to PayPro Global and let a Merchant of Record handle global payments, taxes, and compliancefor you
We just released PayPro Global Payment Gateway for WooCommerce, a new plugin that lets your store accept payments through PayPro Global, a global payment platform and Merchant of Record built for selling SaaS, software, and video games.
If you sell digital goods, you’ve probably encountered some of these common issues: collecting and remitting VAT and sales tax across dozens of jurisdictions, handling chargebacks, or offering local payment methods your customers trust. PayPro Global acts as the Merchant of Record, which means they take all of that on themselves.
Our plugin is the bridge that connects PayPro Global to your WooCommerce checkout.
How It Works
The plugin adds a new payment gateway type to WooCommerce. Here’s how it works:
The customer fills in the WooCommerce checkout and clicks “Place Order”.
They’re redirected to the PayPro Global hosted checkout page, pre-filled with their billing details.
After payment, PayPro Global sends an IPN (Instant Payment Notification) back to your store.
The plugin verifies the IPN signature and updates the order status automatically.
You also get a test and debug mode with logging, so you can confirm everything works before going live, and free setup by our support team if you’d rather not configure it yourself.
If you’re a web developer building for clients, contact us for a coupon code.
Looking for other ways to improve your WooCommerce store? Check the complete list of our plugins that can help you bring your clients the best online shopping experience!
Adding a YouTube video to your WooCommerce product pages can significantly boost engagement, improve conversion rates, and help customers better understand your product, ultimately reducing costly returns.
There are several dedicated plugins that let you add YouTube videos to your product pages. But if you want to avoid adding one more plugin to your WordPress site (and that means: another plugin to keep updated, extra scripts loading on every page, worrying if developers will maintain it), here’s another solution: use our code snippet and add it to your child theme.
What this code does:
Adds a Custom Meta Box for YouTube Video ID
Saves the YouTube video ID when the product is saved
Hooks the YouTube video into the product summary, just below the price
We created this for ourselves and are happy to share it 😉
Table of Contents
Why Add YouTube Videos to Product Pages?
Better product understanding: Customers see the product in action.
Higher conversion rates: Video increases trust and purchase intent.
Lower return rates: Buyers know exactly what they’re getting.
Improved SEO: Video content can increase time-on-page and ranking signals.
Lighter server load: Videos stream from YouTube, not your own hosting.
Before You Start: Set Up a Child Theme
This code belongs in a child theme, not your main (parent) theme. A child theme inherits everything from the parent but keeps your custom code separate, so theme updates won’t wipe it.
You need:
A base (parent) theme like Storefront (or Avada, Divi, or any WooCommerce-compatible theme works)
A new folder at /wp-content/themes/mycustomtheme/ with its own style.css and functions.php
Note: You can also grab this snippet from our Pastebin, where we share all our code snippets: WPGenie on Pastebin.
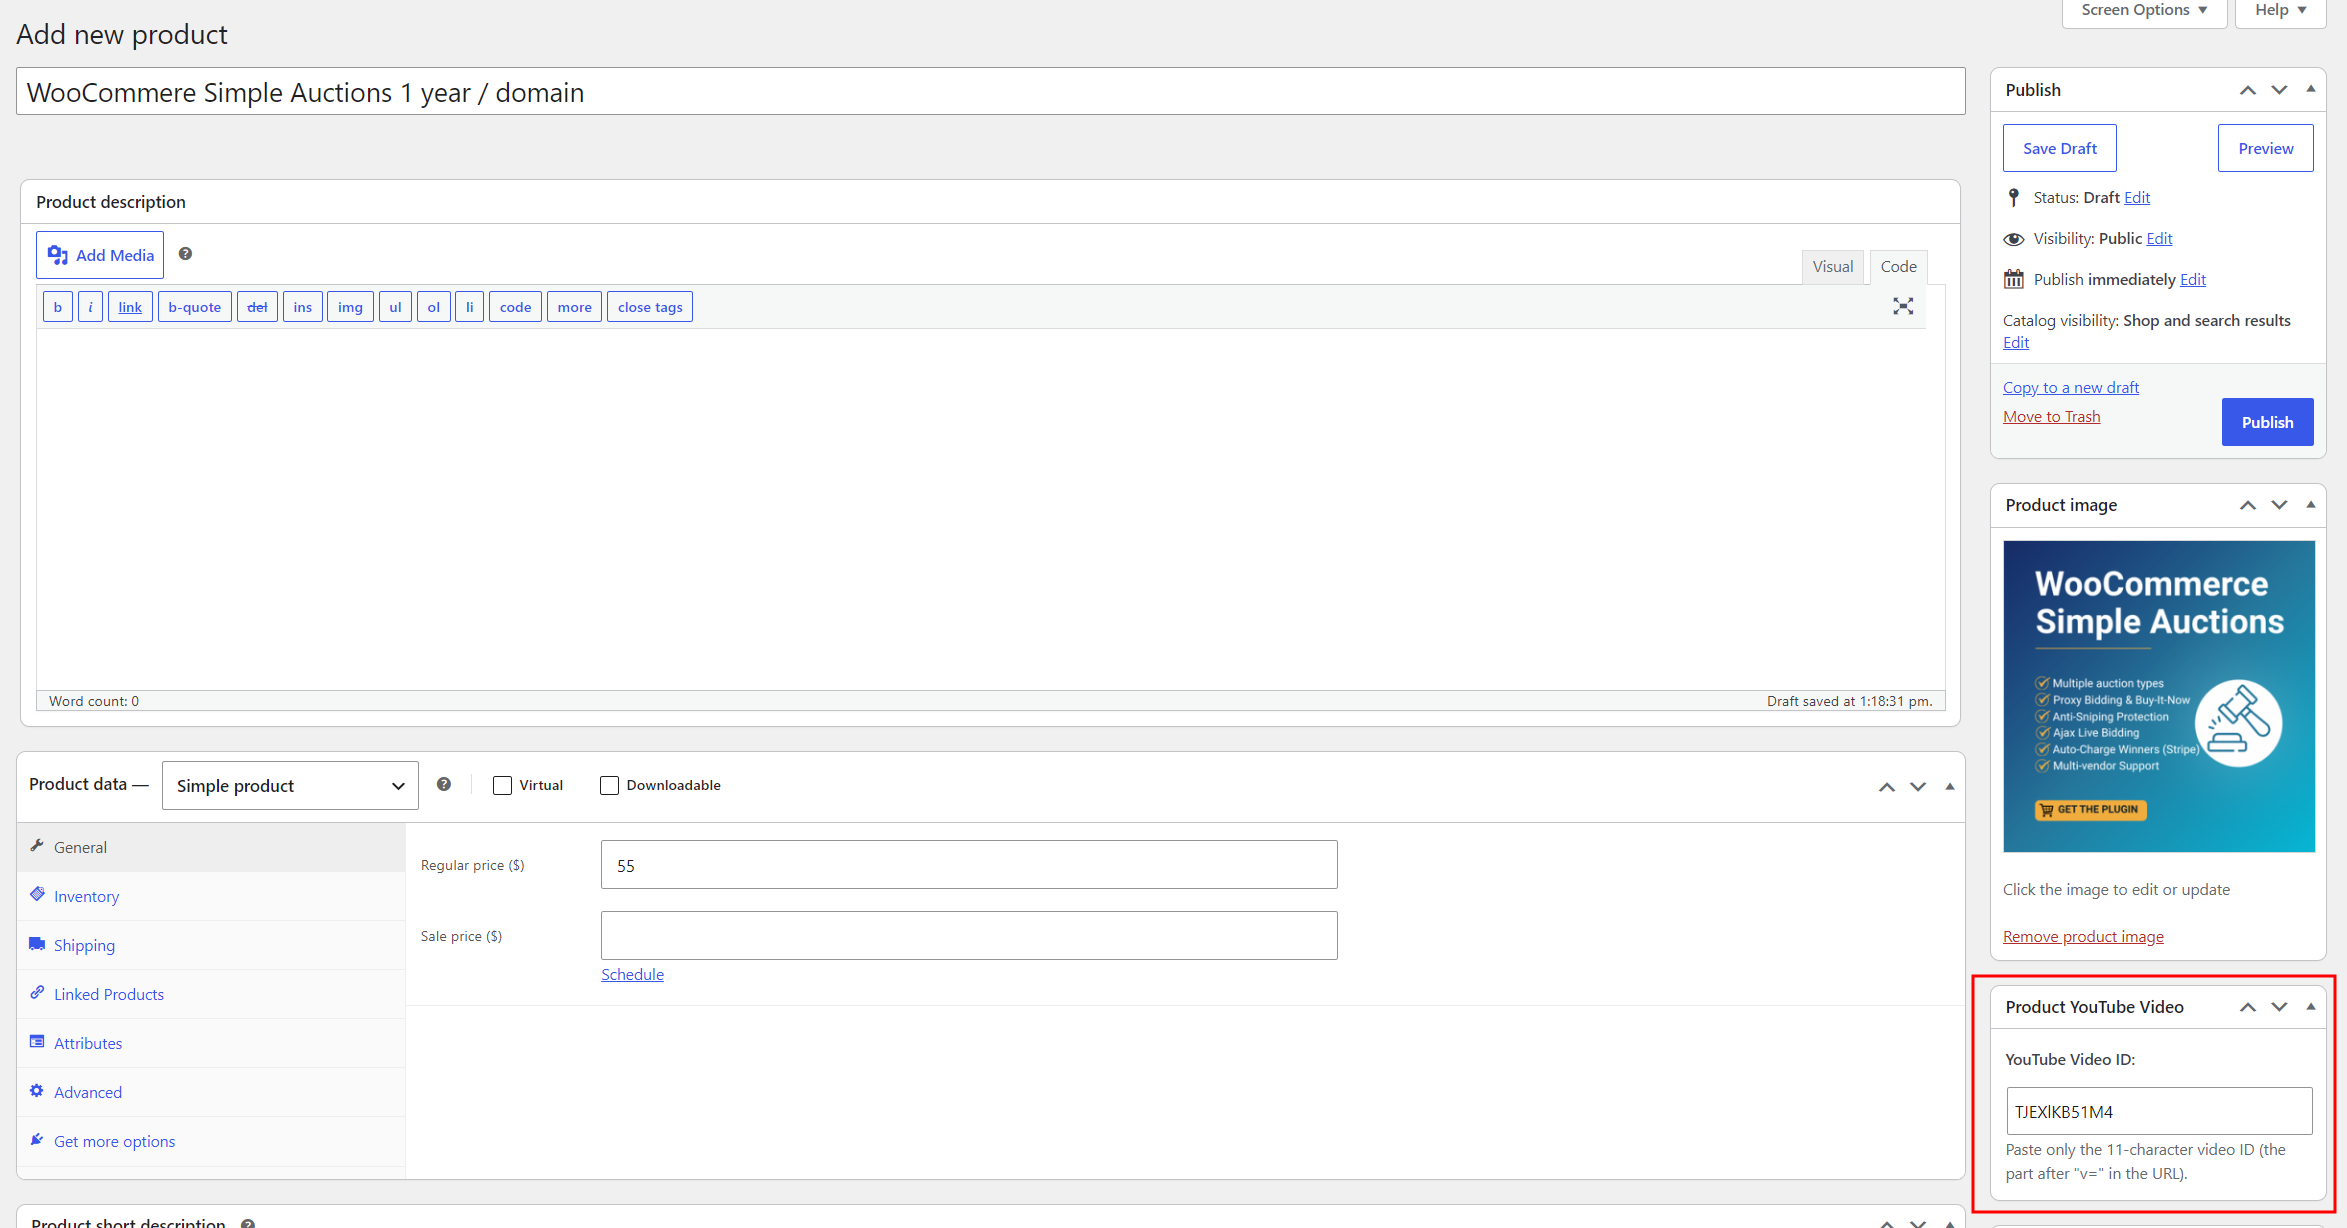
Step 3: Add a Video to a Product
The snippet adds a new box to your product editor. Go to Products > All Products and open any product. In the right sidebar, near the Product Gallery, you’ll see a box called Product YouTube Video.
Paste only the video ID, not the full URL. The ID is the 11 characters after v= in a YouTube link. For example, in https://www.youtube.com/watch?v=TJEXlKB51M4 the ID is TJEXlKB51M4.
Drop that into the field and click Update.
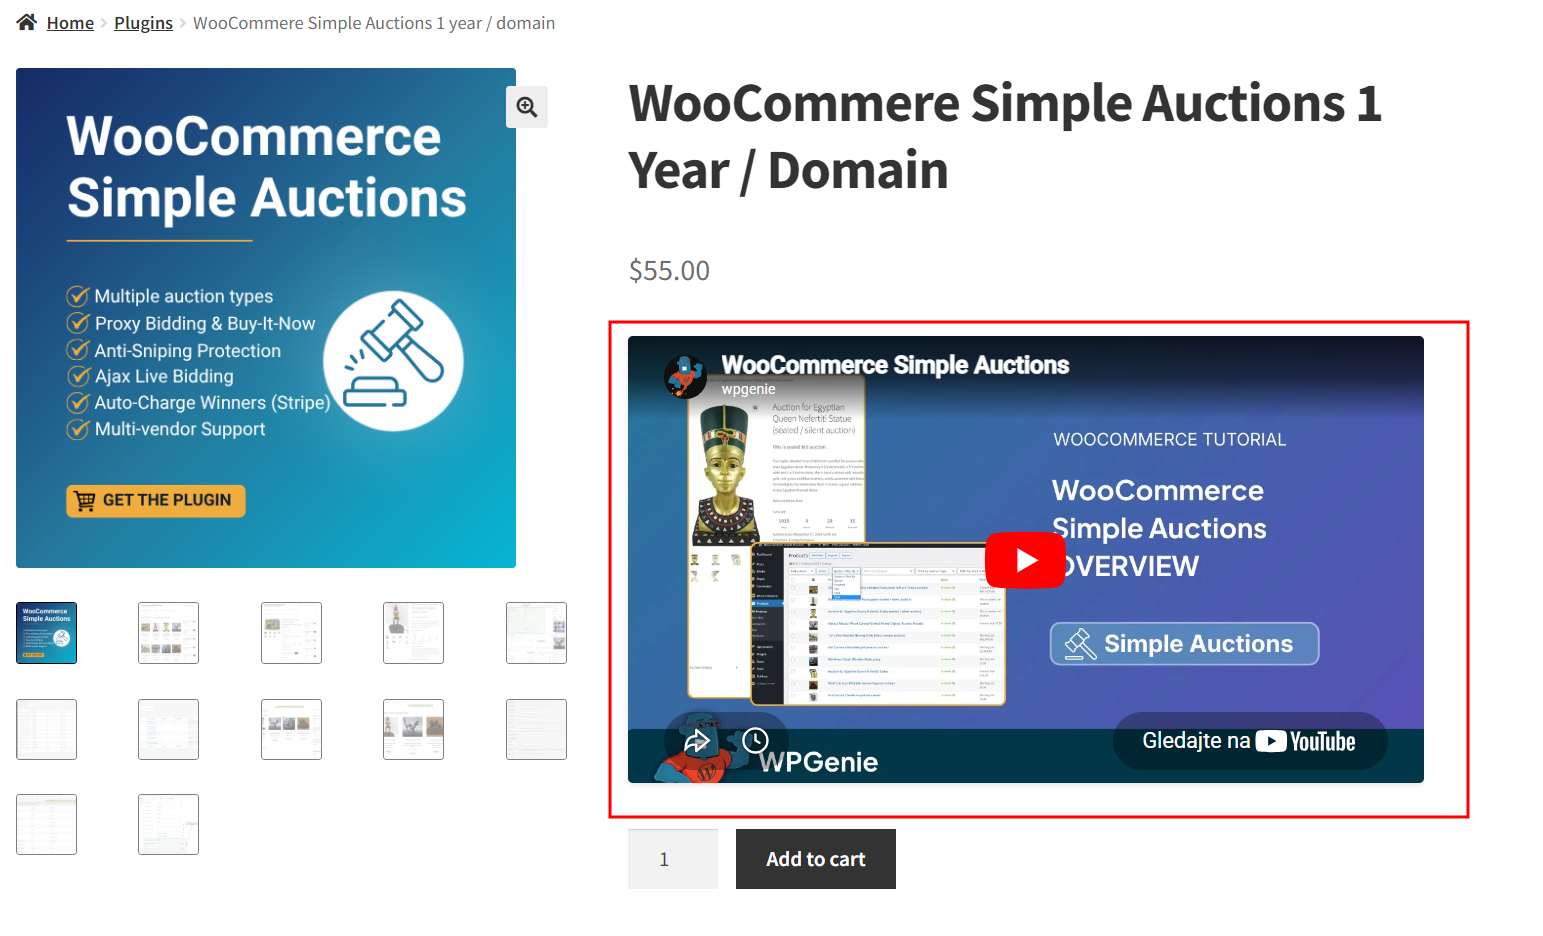
Step 4: Check the Product Page
Open the product on your store. The video appears in the product summary, just below the price and above the short description.
Repeat Step 3 for any other product you want a video on.
Looking for other ways to improve your WooCommerce store? Check the complete list of our plugins that can help you bring your clients the best online shopping experience!
This add-on lets store owners easily create and sell instant-reveal mystery boxes, each containing a curated selection of products. Before buying, customers can see the list of products they could get, and right after checkout they can instantly “open” the mystery box and find out what they got.
This gamified shopping experience boosts engagement through curiosity and anticipation. Surprise boxes are fun to open, and when packed with real value, they work well at clearing inventory or rewarding loyal customers.
How it Works
MysterX adds a custom ‘Mystery Box’ product type to WooCommerce. Store owners configure each box by selecting winnable products, setting stock levels per item, and defining the box price.
On frontend, customers can see the list of gift products in the box, and there’s also option to show the value (price) of each reward and winning chances.
Customers buy a surprise box and open it from My Account > Boxes, where an animated reveal shows their prize. This section also lets them track unopened boxes and view all prizes won.
PRO version
The PRO version unlocks additional features for user engagement and reward control.
Opening Animation & Confetti On Win
Add game-style spinner animation for the opening and fun confetti animation when the prize is revealed.
Custom Sound Effects
Choose from built-in effects or upload your own audio for spinning, opening, rare item reveal, and legendary item reveal.
Probability & Weight Control
Set custom item weights to determine exactly how rare or common specific products are.
Premium Support
Direct access to the WPGenie ticket support system at wpgenie.org/support.
Screenshots
Mystery Box with possible gift products (frontend)My Account – Boxes and WinsMysterx – SettingsMysterx – Product data “Mystery Box”Mystery Box – ProductsRolling animation and confetti on win
If you think about online auctions, eBay is the first thing that comes to mind. But much has changed since the early days of eBay, from the type of merchandise offered to buyers’ preferences. Nowadays, reports show that just 12% of listings use the auction format. Auctions still shine for niches like collectibles or antiques, but even those sellers are not quite satisfied with the world’s biggest marketplace. High platform fees, no ownership over customer data, zero control over suspensions and search rankings, plus auction limitations like no anti-sniping, are the reasons why many consider an alternative: running auctions on their own website.
Although setting up an online auction site can feel overwhelming at first, with WordPress, WooCommerce, and the right auction pluginfor WooCommerce, that’s entirely achievable. Of course, that doesn’t mean there’s not a lot to get right before your marketplace can take off!
If you are thinking about running auctions on your own website, this guide covers how to add auctions to WooCommerce from start to finish: how auction plugins work, which auction formats are available (and keep in mind, not all plugins support every auction type!), the key features that separate premium plugins from basic ones, and what it takes to run auctions that actually generate results.
Table of Contents
What Is a WooCommerce Auction Plugin?
WooCommerce itself handles standard e-commerce: products, shopping carts, checkout, and payments. Because it has no built-in auction functionality, if you want to run auctions on your site, you need an auction plugin.
Auction plugin extends WooCommerce by adding a new product type, auction, with its own rules: start price, end date/time, bidding logic, real-time updates, and automated notifications.
When someone bids on your product, the plugin records that bid, checks it against existing bids and the reserve price if you’ve set one, and updates the current price in real time. When the auction ends, the plugin identifies the winner, sends notification emails, and (if your payment gateway supports it) can automatically charge the winner’s stored card without them needing to manually return and pay. Everything else (product descriptions, images, checkout process, order management) stays exactly as it is in standard WooCommerce. On your website, auction products can sit alongside your regular products, or, if you prefer, get their own dedicated page. You can even group related auctions into lots on a single page.
Types of Auctions You Can Run on WooCommerce
If you are looking for auction plugin, you are most certainly aware that there are different types of auctions.
Once you know what kind of auction you are going to have on your site, you can choose the appropriate plugin. Basic auction plugins handle only standard bidding, while premium plugins offer some or all of the options listed below.
This is the most familiar format, the one that first comes to mind when people think about auctions. Seller sets the starting price, and buyers place increasingly higher bids. At the end of the auction, the highest bidder wins and pays that final bid price.
This kind of auction is best suited for collectibles, antiques, art, memorabilia, estate items, livestock, anything where competitive bidding between multiple interested buyers is likely to drive the price upward.
Proxy Auction (Automatic Bidding)
Proxy bidding is more of a feature layer that sits on top of standard auctions, not a separate format. With proxy bidding enabled, a buyer sets their maximum bid once. The system then automatically bids the minimum necessary increment on their behalf whenever they’re outbid, up to their stated maximum.
Proxy auction offers advantages both for buyers and for sellers. It removes the frustration of constant re-bidding, while it also tends to produce higher final prices because buyers commit their true maximum rather than gaming the system with low incremental bids.
Reverse Auction
As the name suggests, the logic of this type of auction is inverted: the lowest bid wins. This type of auction is used when someone is buying services (such as freelance work, or construction bids) rather than selling products. For example, if you need a website built, instead of paying a fixed price, you can run a reverse auction where developers compete by bidding lower prices.
This type of auction is best suited for procurement, freelance project commissioning, and bulk supply contracts. It is less common in consumer retail but genuinely useful for B2B use cases.
Sealed Bid (Silent) Auction
Bids are hidden from all participants during the auction. Each bidder submits their bid without knowing what others have offered. At the end of the auction, bids are revealed and the highest (or lowest, in a sealed reverse auction) wins.
Sealed auctions prevent bidding wars that artificially inflate prices and eliminate last-minute sniping. They’re the standard format for charity fundraising events (for example, the traditional silent auction at a gala), estate sales, and situations where the seller wants a clean, fair process without competitive bid escalation.
Penny Auction
A penny auction is a format where each bid increases the price by a very small fixed amount (for example, one cent) but requires bidders to pay a fee for every bid they place. Each new bid also resets a short countdown timer, extending the auction and encouraging continued participation. While the final price of the item may remain low, the total revenue comes from the accumulated bidding fees. This type of auction is best suited for consumer-facing platforms focused on entertainment and high engagement. It is less about efficient price discovery and more about gamification, making it controversial and less common in traditional commerce. If you’re running auctions with our WooCommerce Simple Auctions plugin, you can easily implement this pay‑to‑bid model with our Buy Bid Credits add‑on.
Private Auction
A private auction restricts participation to a selected group of invited or approved bidders rather than the general public. The auction mechanics can follow standard or other formats, but access is controlled to ensure confidentiality, exclusivity, or qualification of participants. This is often used when sensitive assets or high-value items are involved. This type of auction is best suited for high-value transactions, B2B deals, and situations where the seller wants to limit visibility or ensure that only serious, pre-qualified bidders take part. It is less common in open marketplaces but widely used in specialized and professional contexts.
As a seller, you need to start by matching the auction format to your product type, inventory goals, buyer behavior, and revenue targets.
This table can help you with that:
Auction Goal
Questions to Ask
Best Auction Types
Maximize price
High-demand items? Collectibles or antiques?
Standard/English (ascending bids, highest wins) or Proxy (auto-bids to your max)
Quick sale
Perishables or bulk? Time-sensitive?
Reverse (price drops until bought) or Sealed bid (one-shot private bids)
Minimize price
Services or sourcing (e.g. freelancers)?
Reverse (lowest bid wins)
Excitement & engagement
Niche communities? Subscriptions tie-in?
Silent (hidden bids for suspense) or Penny (low-increment fun bids)
Unique or private
Invite-only? High-value?
Private (restricted bidders only)
Must-Have Features in a WooCommerce Auction Plugin
As previously said, WooCommerce auction plugin should support different auction types (normal, proxy, reverse, silent). But there are other essential features you may need, from countdown timers and automated email notifications to AJAX bidding. Also, you need to look for robust admin controls such as reserve prices, Buy-It-Now options, bid increment management, and automatic winner payment handling.
Here is a list of features you should consider before purchasing an auction plugin:
Reserve price
The minimum you’re willing to accept. If no bid reaches it, the auction ends without a sale.
Buy-It-Now
Lets impatient buyers skip the auction and purchase immediately at a fixed price. Configurable to disappear after the first bid or stay available throughout.
Real-time bidding
Bids update instantly for every visitor without a page refresh. Without this, buyers won’t know they’ve been outbid until they manually reload.
Anti-sniping protection
If a bid lands in the final minutes, the auction end time extends automatically, giving all legitimate bidders a fair chance to respond.
Automated winner payment
Requires bidders to store a card before bidding, then charges the winner automatically at auction close. Solves the non-paying winners problem.
Relist functionality
When auctions fail — reserve not met, winner didn’t pay, item unsold — you need to relist fast. Look for both manual and automatic relist options.
User engagement tools
Watchlist, My Auctions page, and winning badge on thumbnails — these keep buyers returning and actively participating between auctions.
Email notifications
Full set of editable templates for buyers and admins: outbid, won, payment due, relisted, ending soon. Check that ending-soon timing is configurable.
Admin reporting
Running multiple auctions at once means you need full bid history and winner reports — ideally with CSV export — to stay on top of everything.
Page builder compatibility
Check for explicit compatibility with Elementor, Gutenberg, or whatever you use. You don’t wnat the plugin breaks your layout.
Multivendor support
Building a marketplace? Check for compatibility with Dokan, WC Vendors, WCFM, or similar multivendor plugin.
WPGenie’s WooCommerce Simple Auctions supports all auction types and includes all of these features. For the complete feature breakdown, pricing, and a live demo, visit: WooCommerce Simple Auctions
Who Runs WooCommerce Auctions on Their Own?
From small shops to specialized sellers, many different types of businesses use specialized auction plugins to handle bidding on their own websites.
There are store owners who already use WooCommerce, and want to add auctions alongside regular products without moving to a marketplace like eBay. Companies sometimes run private or invite-only auctions for surplus inventory, equipment, or bulk sales to a known group of buyers. And some use auction plugins to create multi-vendor platforms where users can list and auction their own items, essentially building a niche auction marketplace.
But typically, self-hosted auctions fall into niche categories where item value is subjective or inventory is unique:
Collectible & Memorabilia Dealers
This is the most common group. Because WooCommerce allows for complete branding control, collectors prefer it over eBay to avoid high seller fees.
Antique Dealers: Shops selling vintage furniture or rare “one-off” finds.
Sports Memorabilia: Sites auctioning signed jerseys, trading cards, and historical equipment.
Comic & Game Shops: Used for high-value “slabbed” comics or rare Magic: The Gathering cards.
Luxury & High-End Goods
Brands that want to maintain a “premium” feel use WooCommerce auctions to keep users on their own site rather than a crowded marketplace.
Luxury Watch Resellers: Using “Proxy Bidding” features to manage high-stakes sales of Rolex or Patek Philippe pieces.
Fine Art Galleries: Independent artists or galleries use it to host timed digital or physical art auctions.
Classic Car Brokers: Boutique automotive sites use WooCommerce to list vintage vehicles with “Reserve Prices.”
Non-Profits & Charities
Charities often run “Silent Auctions” for fundraising events. WooCommerce is a favorite here because it integrates easily with donation plugins.
School Fundraisers: Auctioning off “Teacher for a Day” experiences or donated gift baskets.
Gala Organizers: Using the mobile-friendly interface to let attendees bid from their phones during a live event.
Specialized Niche Markets
Livestock & Agriculture: Surprisingly, cattle and horse breeders often use WooCommerce to auction embryos or prize animals directly to other farmers.
Real Estate: Boutique firms and land developers use WooCommerce for Accelerated Sales or Sealed Bid auctions. This is particularly effective for property foreclosures or quick-sale land plots where the goal is to find a buyer within a fixed timeframe.
Domain Flippers: Web developers often set up a simple WooCommerce site to auction off premium domain names they own.
Getting Started With Self-Hosted Auctions
Here is the essential checklist of what you need to launch a professional self-hosted auction site:
1
WordPress site with WooCommerce installed and configured
WooCommerce is free. You’ll need a hosting environment capable of running WordPress reliably.
2
Auction plugin
Choose a plugin that supports the type of auction you want to run on your website, with all the necessary features listed above.
3
Payment gateway with pre-authorization
You want a processor (like Stripe) that can verify a bidder has the funds before they bid, or at least one that saves their card on file so you can charge the winner immediately.
4
High-performance hosting
Be careful with shared hosting — the last thing you want is a cheap server that crashes in the final minutes of your auction.
Tips for Running Successful Auctions
Having the right plugin properly configured is only the part of the story. The auctions that actually generate results share a few practical characteristics that have nothing to do with settings or features. So, let’s talk about presentation and marketing.
Visuals, Descriptions and Pricing Strategy
If you ever bought or sold something online, you are probably aware that high-quality visuals and detailed descriptions are the most important thing in online sales. Same applies to auctions: listings live or die on how well the item is presented. Even if you have the most desirable item, a blurry photo and a two-line description won’t generate competitive bidding. Buyers bidding online can’t inspect the item physically, so photos and description are all they got.
Every listing should have multiple high-quality photos from different angles, with any relevant details shown clearly. A short video can do even more: it shows the item’s condition more clearly, conveys scale and movement, and builds buyer confidence and trust. You can add a YouTube video of the auction item directly to the product page so bidders see it without leaving the listing.
Descriptions should answer the questions a serious buyer would ask: condition, dimensions, provenance, any defects. If you wouldn’t feel confident bidding on it yourself based on what you’ve written, rewrite it.
Also, do your research and be careful with starting price. If it’s set too high, it will kill early bidding momentum, and an auction sitting at zero bids discourages participation. Setting a realistic, slightly lower starting price invites early bids, which in turn attracts more bidders. Don’t forget that you have reserve price to protect the value of your item.
Auction Promotion
An auction with no bidders is just a product with a countdown timer. Competitive bidding requires an audience, and that audience doesn’t arrive automatically. Promotion is not optional, it’s part of running auctions effectively.
Start promoting before the auction opens. Give your existing customers and followers time to notice, get interested, and plan to participate. Email your list with a preview of what’s coming up. Post on social media when the auction goes live and again when it’s ending soon. The final hours of an auction are when bidding escalates most, and a well-timed reminder at that point directly drives last-minute competition.
For specialist niches, community channels are the pillar of promotion. For example, Koi breeders have forums and Facebook groups, while collectors have subreddits and Discord. Charity auctions have mailing lists of existing donors. Find where your buyers already gather and make sure they know your auction exists.
Conclusion
Running WooCommerce auctions on your own site puts you in full control over fees, data, branding, and buyer experience. It’s no wonder that self-hosted auctions are used by thousands of businesses ranging from solo antique dealers to large livestock operations.
With the right plugin like WPGenie’s WooCommerce Simple Auctions, solid hosting, and smart promotion, you can turn unique inventory into competitive bidding wars that drive real results.
That said, self-hosted auctions are not for everyone. They require an existing audience, a willingness to maintain a WordPress site, and realistic expectations about what a plugin can and can’t do on its own. If you’ve read this far and the fit feels right, the next step is simple.
Start small: pick one auction type, nail your listings with pro visuals and low starting prices, promote early via email and niche communities, and scale from there. Self-hosted auctions aren’t just an eBay alternative, they’re your edge in niches where personalization wins.
What do I need to set up a WooCommerce auction site?
To set up a WooCommerce auction site you need four things: a WordPress site with WooCommerce installed, an WooCommerce auction plugin that supports the auction types you want to run, a payment gateway, and reliable hosting.
Can I run auctions alongside regular products in WooCommerce?
Yes. An auction plugin adds a new product type “auction” to WooCommerce. Auction products can sit alongside your regular products, or you can give them a dedicated page.
What are the different types of auctions?
The main auction types are: standard (highest bid wins), proxy (system bids automatically on a buyer’s behalf up to their maximum), reverse (lowest bid wins, used for services and procurement), sealed bid (bids are hidden until the auction closes), penny (buyers pay a fee per bid, final price stays low), and private (restricted to invited or approved bidders only). Not all WooCommerce auction plugins support every format, so check before purchasing.
What is proxy bidding?
Proxy bidding is a system where a buyer sets their maximum bid once, and the plugin automatically places the minimum necessary bid on their behalf whenever they are outbid, up to their stated maximum. It’s called “automatic bidding” on eBay.
What is a reserve price in an auction?
A reserve price is the minimum amount a seller is willing to accept for an item. It is set privately and is not visible to bidders. If no bid reaches the reserve price by the time the auction closes, the auction ends without a sale. It exists to protect the seller from being forced to sell below acceptable value, while still allowing a low starting price to encourage early bidding.
What is anti-sniping protection in online auctions?
Sniping is when a bidder places a winning bid in the final seconds of an auction, leaving no time for other bidders to respond. Anti-sniping protection automatically extends the auction end time when a bid is placed in the final minutes, giving all legitimate bidders a fair chance to respond.
What happens if an auction winner doesn’t pay?
Non-paying winners are a real risk in online auctions. The practical solution is choosing an auction plugin that requires bidders to store a card before bidding, then charging the winner automatically at auction end. If payment still fails, you’ll need relist functionality to quickly put the item back up for sale. For more details, read our guide on how to prevent and handle unpaid auctions.
How much does WooCommerce Simple Auctions cost?
WooCommerce Simple Auctions is a complete, feature-rich solution supporting all auction types. A regular license including 1 year of support is currently $55.00 / year / domain in our store. Check the listing for the latest pricing and any active discounts.
Looking for other ways to improve your WooCommerce store? Check the complete list of our plugins that can help you bring your clients the best online shopping experience!
Just a few weeks ago, we celebrated 12 years of WooCommerce Simple Auctions, the first-ever auction plugin for WooCommerce. Today, it’s time to celebrate another milestone: 10 years of WooCommerce Lottery!
On March 2nd, 2016, we released WooCommerce Lottery, the first lottery and competition plugin for WooCommerce. What started as a simple lottery extension has grown into a complete competition platform used by thousands of site owners worldwide.
Today, we’re on version 2.2.8, and together with our Pick Ticket Number addon, WooCommerce Lottery now powers professional competition sites with numbered tickets, instant wins, skill-based questions, and manual live draws.
None of this would have been possible without our customers who trusted us from the start and helped shape every feature with their feedback and ideas. A huge thank you to all of you!
20% Off to Celebrate!
To mark 10 years, we’re offering 20% off WooCommerce Lottery on CodeCanyon and 20% off Pick Ticket Number and Dokan Lottery Integration in our store (use code LOTTERY10 at checkout).
Grab WooCommerce Lottery and its addons at anniversary pricing until March 15th!
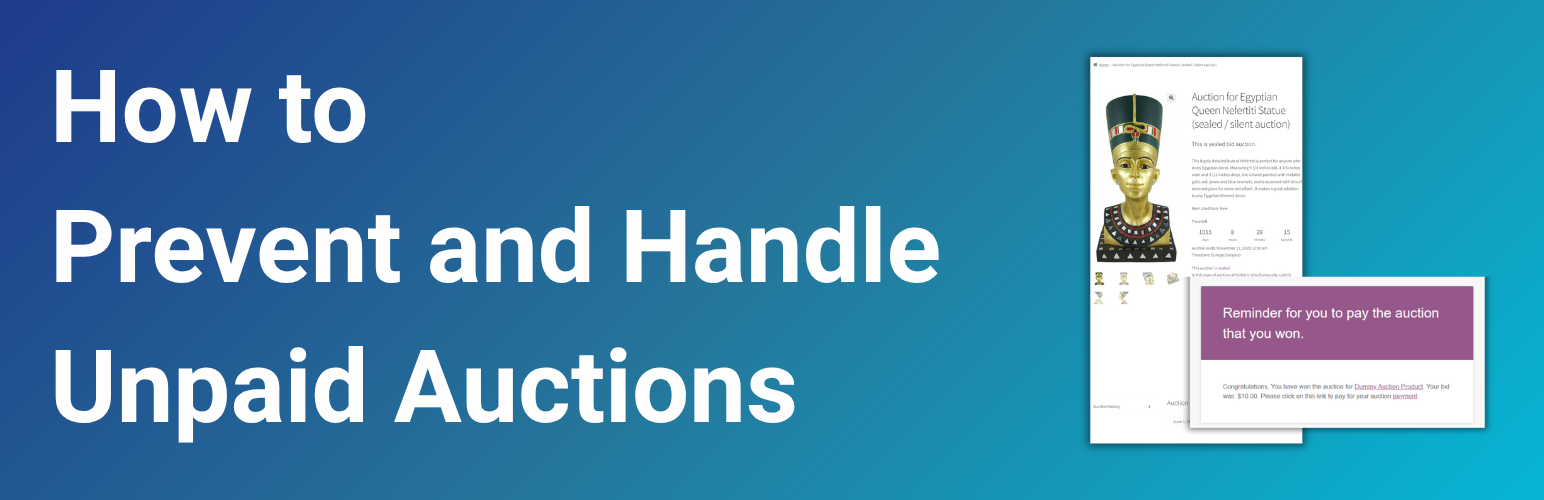
Non-paying auction winners are one of the biggest challenges in managing online auctions. This tutorial explains how WooCommerce Simple Auctions helps prevent non-paying bidders, and what options sellers have when a winning bidder doesn’t complete payment.
If you run WooCommerce auctions, you’ve probably encountered this kind of problem:
“At least once a week I get someone who wins a bid and then doesn’t pay. I just had a buyer who outbid someone else respond to the message by asking me questions about what item they won. They are literally acting like they don’t know what they bid on. I just don’t understand!”
Or as another seller put it:
“I’m so sick of people winning auctions and then just never paying! How do I avoid this?”
Online auctions are a great way to engage customers, create urgency, and drive higher prices through competitive bidding, but almost every seller has experienced the downside: buyers who win auctions but fail to complete payment.
Why does this happen? It could be buyer’s remorse, impulse bidding, automated bots, or even kids bidding for fun through a parent’s account. Whatever the reason, non-paying auction winners are a huge problem for many sellers.
This is why more and more sellers go with the buy-it-now option. It’s a safer alternative, but unfortunately, it’s also less profitable, since auction items typically sell for more than buy-it-now items. Not to mention that buy-it-now never reaches the same level of excitement and engagement that auctions offer.
In this tutorial, we will cover options that WooCommerce Simple Auctions plugin offers to help sellers prevent unreliable bidders from participating in auctions. We will also explain what to do when an auction ends and the winner doesn’t pay for the won item.
Table of Contents
Prevent Unpaid Auctions
The most effective way to prevent unreliable bidders is to verify their payment method before they can place any bid. This ensures that only users with a valid, working payment method can participate in your auctions.
With WooCommerce Simple Auctions, you can do this in two ways: you can require users to add a payment method to their account before bidding (built into Simple Auctions v3.0, works only with Stripe payment gateway), or you can require users to make an actual payment before they can participate in any auction (available through Simple Auctions addons, works with any payment gateway).
Require Users to Provide a Payment Method Before Bidding
Starting with Simple Auctions v3.0 we added a new option in the auction settings: Do not allow bidding without Credit Card on file.
If you’re using the Stripe Payment Gateway, you can set the plugin to only allow bids from users who have a valid credit card saved to their account.
This immediately reduces the number of bidders who are not truly interested in the auction; anyone willing to save a card has at least some real intent. It also sets up everything needed for the next feature: automatic charging when the auction ends.
Automatically Charge the Winning Bidder’s Credit Card
Starting with Simple Auction v3.0 we also implemented this great feature: Automatically charge for won auction.
This option also works only with Stripe Payment Gateway. When this option is enabled, the winner’s credit card will be automatically charged at the end of the auction.
You can see how this works in this video:
Important: Both features are available from Simple Auctions v3.0 and require the free WooCommerce Stripe Payment Gateway plugin.
Require Users to Make a Payment Before Bidding
If you’re not using Stripe Payment Gateway, WPGenie offers three add-ons to WooCommerce Simple Auctions, and each can help solve the problem of non-paying winners. These addons require users to make a payment before they can participate in any auction, which both verifies that their payment method works and filters out anyone not serious about bidding.
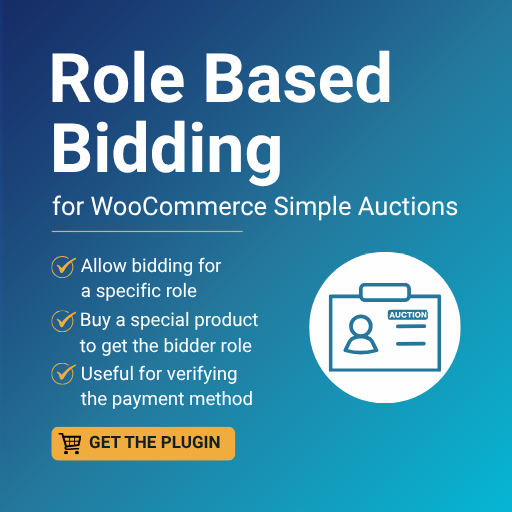
Role Based Bidding and Payment Verification Addon
With Role Based Bidding add-on, bidders need to purchase a specific product and get their role changed to one that can place bids (for example, you can define virtual product called “Become Bidder” and set the price at $1).
This purchase confirms their payment method is valid, and their account role is automatically changed to the one that’s allowed to bid, and from that point they can participate in auctions.
Role Based Bidding add-on is also useful for running members-only auctions, where bidding is restricted to a specific group of registered members.
Buy Bid Credits Addon
With Buy Bid Credits addon, only users who have purchased bid credits can place bids. Bid credit packages are sold as regular WooCommerce products, and users spend credits whenever they place a bid.
Since users must buy credits before bidding, their payment method is automatically verified.
Buy Bid Credits add-on is also used to build penny auction websites.
Seated Auctions Addon
With Seated Auctions add-on, you require users to purchase a “seat” before they’re allowed to bid on a specific auction. This again serves as payment verification and filters out unserious bidders.
You can define a simple product to use as a “seat” and define its price, and you can also limit number of seats available, controlling attendance and bidder quality (for example, if you want to run limited-entry auctions for specific high-end items).
Manage Unpaid WooCommerce Auctions
What are your options if an auction ends, and the winner doesn’t pay? Simple Auctions offers a few build-in features for this kind of situation.
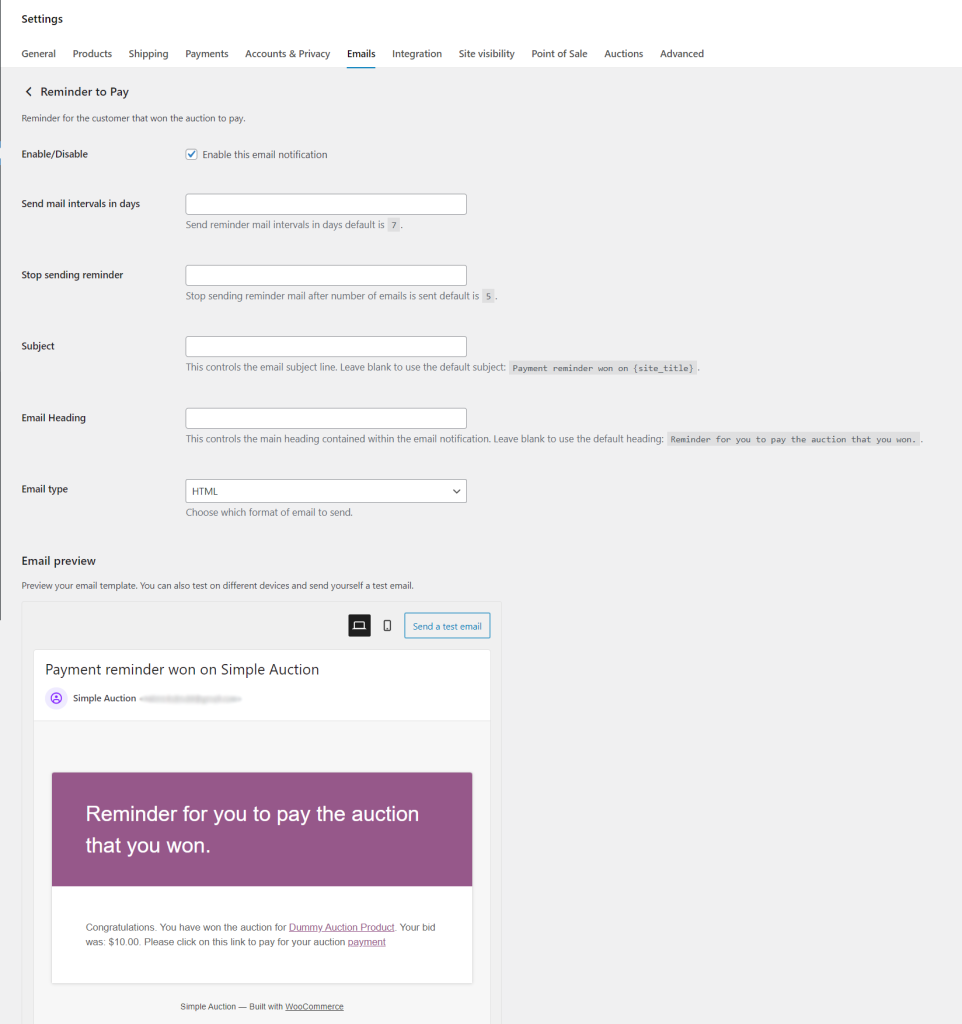
Payment Reminders to Winners
E-mail notifications
When an auction ends, the winner automatically receives an email notification with a payment link.
If the winner doesn’t pay, Simple Auctions can automatically send payment reminder emails. You control how often these reminders go out (default is every 7 days) and how many reminders to send before stopping.
SMS notifications
If email isn’t getting through, Simple Auctions supports SMS notifications via a third-party plugin. This gives you an additional channel to reach winners who haven’t responded to email reminders.
Move the Win to the Next Highest Bidder
If a winner doesn’t pay, you can manually delete their winning bid (you need to do this in the Auction History tab of the auction product).
The next highest bidder will then become the winner. This means an unpaid auction doesn’t have to be immediately relisted. In many cases, the second bidder is still interested and happy to complete the purchase.
Important: You need to manually contact the next highest bidder and send them auction URL where they can see “Pay Now” button so that new winner can complete payment.
Relisting Unpaid Auction
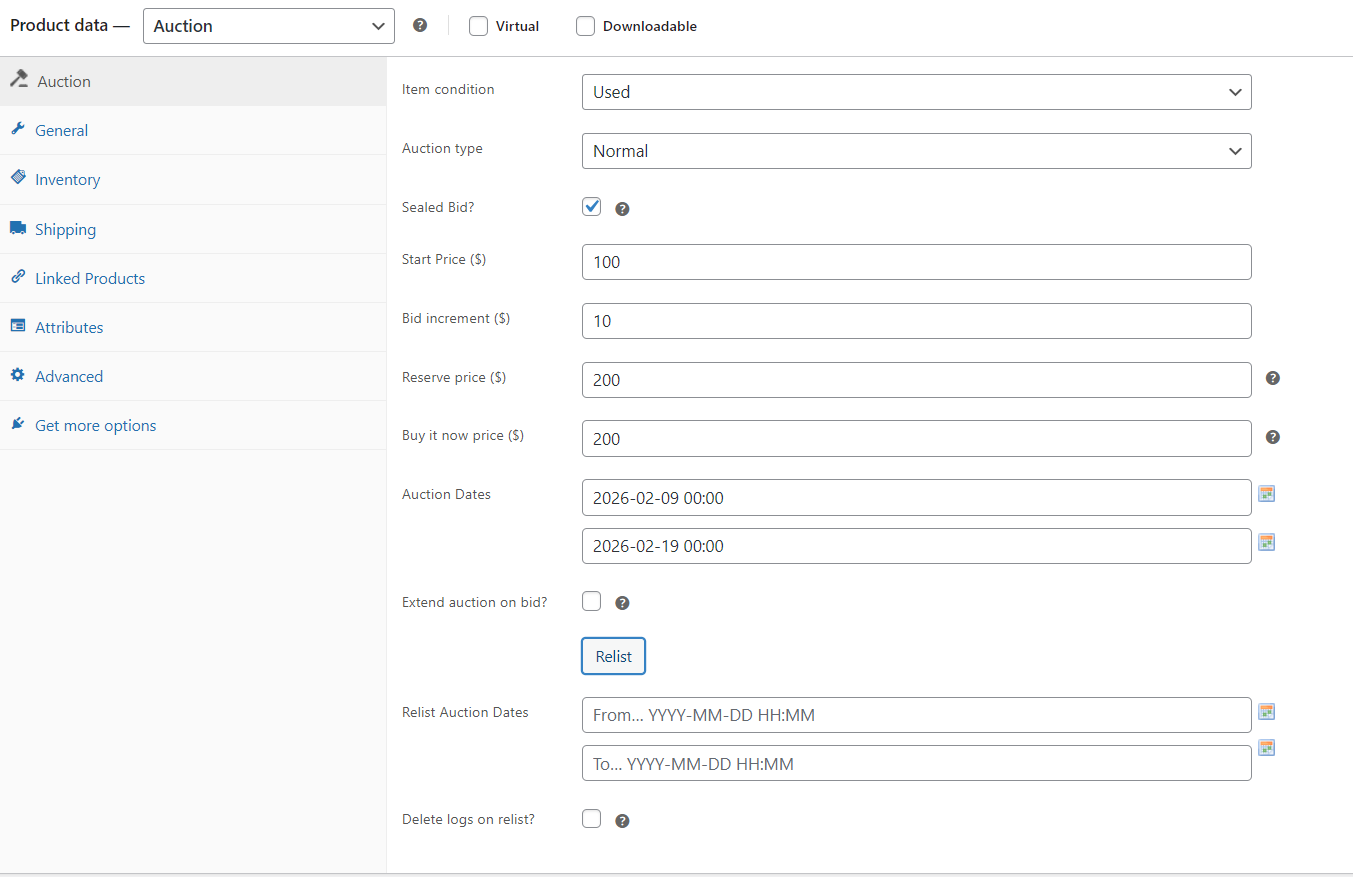
If the winner doesn’t pay, Simple Auctions has options to manually or automatically relist unpaid auctions.
Automatically Relist Unpaid Auctions
You can set the plugin to automatically relist any auction where the winner hasn’t paid within a set number of hours. Once that time passes, the auction goes back up.
This option is available on product edit page:
Manually Relist Unpaid Auction
If you don’t want to use automatic relist option, once an auction ends without payment, an option for manual relisting will show on product edit page.
You need to set a new duration (start/end dates). There’s also an option to “delete logs on relist”, which removes all previous bids/logs (can’t be undone!).
Conclusion
Unpaid auction winners are (unfortunately) a common problem for sellers, but with the right strategies, you can minimize their impact and keep your auctions running. By requiring bidders to verify their payment method, using automatic charging with Stripe, or implementing payment verification addons, you ensure that only serious buyers participate.
Even if a winner doesn’t pay, WooCommerce Simple Auctions provides you with options to manage the situation: send payment reminders via email or SMS, assign the win to the next highest bidder, or relist the auction automatically or manually. Using these tools together helps protect your revenue, and keep your auctions profitable.
Looking for other ways to improve your WooCommerce store? Check the complete list of our plugins that can help you bring your clients the best online shopping experience!
Twelve years ago today, on February 13th, 2014, we released WooCommerce Simple Auctions, the first-ever auction plugin for WooCommerce.
Fast forward to today, we’re on version 3.0.6, and our plugin is still the most affordable auction solution for WooCommerce, with 8,000+ sales on CodeCanyon and an amazing 4.66 out of 5 stars from independent reviewers.
Our plugin has been actively supported and developed for 12 years, and this wouldn’t be happening without all of our customers and supporters who trusted our product and helped us to make it better and better with each new release. So a big thank you to all of you!
During this period we have managed to add a lot of new amazing features, including our latest additions: payment verification, anti-sniping features, and AJAX bidding.
All of this came from listening to what you needed, so we’re sure there are a lot more features to come in the near future!
To celebrate 12 years, we’re offering 25% off WooCommerce Simple Auctions plugin, and also 25% off plugin’s addons: Seated Auctions, Buy Bid Credits and Role Based Bidding (for addons from our store, use code AUCTION12 at checkout).
Get WooCommerce Simple Auctions and addons at anniversary pricing until the end of February!